


**Update** If you're stopping by from Linda's washi tape party, or live.laugh.rowe's washi tape party, I used washi tape to decorate a picture frame, make sandwich flags, tape appetizer forks to cups, seal treat bags, label centerpieces and to make buntings!
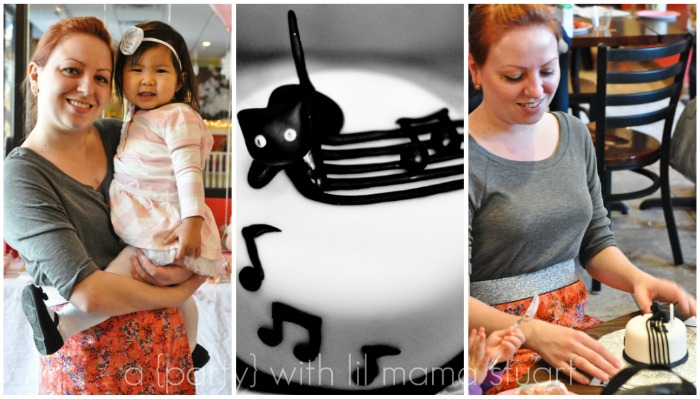
Now that I’ve strung you along with two sneak peeks and my inspiration for Mia’s second birthday party, are you ready for the full reveal?!? This little two year old sure was ready for her party, matching outfit and all! And the outfit was totally not planned! It happened to be a Christmas present - thanks Auntie Judy, it was perfect!
Now that I’ve strung you along with two sneak peeks and my inspiration for Mia’s second birthday party, are you ready for the full reveal?!? This little two year old sure was ready for her party, matching outfit and all! And the outfit was totally not planned! It happened to be a Christmas present - thanks Auntie Judy, it was perfect!

Main Party Supplies/Décor Elements
I kept the food and decor simple since the play café had a lot going on already. My theme was clearly pink and grey stripes, balloons and Mia’s stuffed animals. From my pinterest board, you probably have no idea what direction I was going! 
I wrapped phone books and empty boxes to add height to the table.

Striped Paper & Large Scallop Punch - The striped paper you see throughout is a FREE pattern from Sprik Space that I printed or used in picnik.com to design coordinating thank you tags, food and drink labels and a banner.


Striped Washi Tape and Baker’s Twine – simple way to add color and continue the striped theme. My washi tape was from Sweet Shop Lulu, but you can find lots on etsy too.

Custom name print from etsy shop Baby Byrds.
Balloons – Seen on the invite and used at the food, gift and favor tables.

Food Table
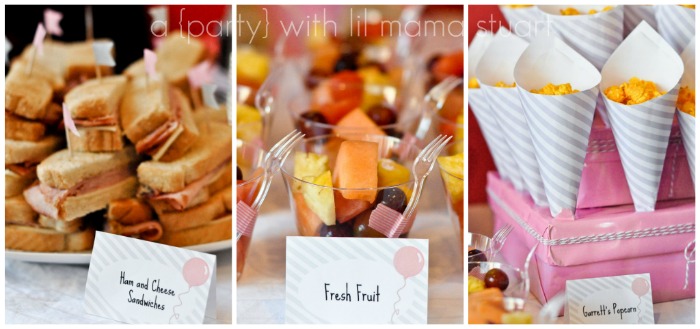
Just like my décor, I kept the food simple. All the food (I made most of it - the day before) and drink to feed 45 people cost ~ $100 (not including the cake). Parties don’t have to be big and extravagant people! It’s the little touches that bring it together and make it special.

Pasta Salad - Not pictured, but recipe here.
Fresh Fruit Cups - Tape appetizer forks (from Party City) to cups with washi tape.
Garrett's Popcorn - Tutorial for the DIY popcorn cones and display can be found here.

M&M Cookies - Here's the recipe. It’s my go-to cookie.
Cake from Sweet Kat's Creations
Home Made Thin Mints - You MUST make these. It’s my new go-to cookie recipe. Seriously, you’ll never want a Girl Scout cookie again. Note: I used andes chocolates because I can't find the baking chips. Drink Station

Juice Boxes – wrapped in patterned paper (FREE) and ribbon

Other Décor
DIY Centerpieces - To top the café tables, I made picture displays from a soup can, bakers twine, newspaper (to stuff the inside), a skewer (that my mom saved from an edible arrangement), paper shreds (that came from my Shop Sweet Lulu packaging), patterned paper and a scallop punch. What I’m saying is that it was FREE, other than the cost of pictures, and $9 for 180 yards of baker’s twine from Pick Your Plum that I used throughout the entire party with a LOT of leftovers.
DIY Happy Birthday Banner = Patterned paper with letters in picnik + scallop punch + wrapping paper + glue stick

DIY Party favors - I filled treat bags from Pick Your Plum with pink and white frosted animal cookies (from Jewel). I loved those cookies as a kid! I designed a thank you tag in Picnik using a background from Sprik Space then cut with a scallop punch. I sealed the bag with washi tape and attached the tag with baker’s twine.

DIY Coloring sheet – I took a picture of Mia’s animal friends and used this tutorial from Centsational Girl to make a customized coloring sheet. Cool, huh!?

Surprisingly, this party came together easily and nearly stress free. The staff at Family Grounds Café were super helpful with the quick (less than an hour) setup.

Auntie Agatha was super helpful too, who I almost brought to tears when I surprised her with a personal mini birthday cake.
Mia had fun and enjoyed helping me with the decorations.
She's still talking about her birthday, which makes it all worth while!

Linked up here:


As seen on:


11 comments:
Turned out beautifully!! I hope to do things this simply for the rest of the parties I plan this year!
Aww, too cute! Happy to help, and thanks for making me part of Mia's special day!
Mia is so cute in her outfit! Love all the decor and food. Great job!
Mia's party is so pretty!! I love the stuffed animal theme - when I was little I used to throw birthday parties where all of my animals were invited. ; )
All of the details (including Mia's name print) are so lovely - you have a great eye for design!
Love it! :)
MINDY! You did a fabulous job! I love it! I tell Mike all the time you make everything look fantastic, inexpensive and easy :). Thanks for all the tips!
wow! great pictures of a wonderful party.
visiting via a link on family grounds fb page! congrats on hosting what looked to be an unforgettable party! :)
Love it! Well done mama!
adorable party!! I invite you to share with my followers on my linky party on Tuesdays!! We love parties!!
Can you tell me where you got the monkey and pig stuffed animals?? I can't figure out where they are from.
Post a Comment