

Photobucket Photobucket Photobucket Photobucket Photobucket Photobucket
Showing posts with label baby shower. Show all posts

Thursday, October 4, 2012

Fondant Cake Decorating Class

Recently, my girlfriends and I took a fondant cake decorating class at Give Me Some Sugar. This small storefront is a cake decorating school in Chicago's neighborhood of Roscoe Village. A blank canvas of a cake or cupcakes are provided and you'll learn how to decorate the goodies to take home.

Not only was Chef Alekka accommodating with our difficult schedules, but the class was BYOB - always a plus in our books! Give Me Some Sugar offers a variety of classes, private events (birthdays, bachelorette parties, etc), and special events (Cupcake & Cocktails - included in the class price are cupcakes/cakes to decorate and take home in addition to drinks and recipes from a mixologist!).

In our two hour private class of three students, Chef Alekka demonstrated how to level and frost our cakes and covered all the little tips and tricks to working with fondant from rolling, dying, covering, shaping, to storing the leftovers. As with everything, you could probably figure out the basics with an internet search. But Chef Alekka filled us in on little tid bits of information here and there that I wouldn't get from a generic online tutorial. After learning the basics from Alekka, I'd definitely try making fondant cupcake or cake toppers for my future parties.

I was surprisingly impressed with Agatha's {the least domestic of us 3} cake decorating skills from leveling, frosting, laying and sculpting the fondant!

Overall, it was a fun Tuesday evening with my girlfriends, polishing off two bottles of wine, learning the basics of working with fondant and taking home three personalized cakes to show for it.


Mia definitely liked the cake I brought her and posed as if she baked it in her little kitchen set :)


Friday, April 27, 2012

Where I've Been

Happy Friday everyone! It's been a little quiet over here, but in the past few weeks lil mama's been popping up on a few sites. Thank you all for the recent features! {click on the pictures or links}

Craftaholics Anonymous | Washi Tape Projects {menu & gift wrap}
Craftaholics.net

Pizzazerie | Pink & Grey Striped Birthday Party

Chickabug

Baby Lifestyles
DIY Thin Mint Cookies
Pink & Green Polka Dot Dol {Korean 1st Birthday}
I Was Featured at Baby Lifestyles

River North Love | Guest Post: 10 Party Planning Tips

Hop on over to check out my featured projects, parties and posts! Thank you for spending a {few minutes} with me

Thursday, April 5, 2012

DIY Pillow Cases - Birthday Gift

You all know by now that I try to give a hand made gift whenever possible. My niece Erin has a lot of open space in her bedroom next to a bookshelf, beneath a window. I thought this would be the perfect spot to create a reading nook. I bought 3 square pillows, in sizes that nest. Big one for daddy, medium one for mommy and small one for baby J
 (The stack of pillows in the back against the crib are Mia's pillows that we cuddle and read on.)

The two big ones were from Target - and oh so soft! The smaller one was from Michael's or Joann's and made just as soft as the other two with a minky fabric pillowcase. Pink and green, just like her party - did you notice? J

In one night, I made all three pillow cases with an easy, basic envelope closure and a few different embellishments.
1. Sew ric rac to the edge.
2. Sew ric rac in a frame and add a bow.
3. Make a "bow". I bought this minky fabric for her newborn photo shoot *sigh*


Cute baby gift, no?

And of course, you have to get some books for the new reading nook. And a big blanket for bed time snuggles.

linked up with Tatertots and Jello and:

Wednesday, March 14, 2012

Baby Boy Birthday/Shower Gifts

Aiden turned one last week and I put together transportation themed gifts for him. Doug doesn't understand why all my gifts must go together! Everything has to make sense. The Martha in me wouldn't have it any other way. I'm weird, I know.

Books - Go Dog Go {Target} and Things that Go {Barnes & Noble}
Transportation Bath Toys {a boutique in the neighborhood}
Cars and Trucks Crayon Roll {etsy shop Because I'm Me via Groopdealz}
Transportation Puzzle {Melissa & Doug from Toys R Us}
Thomas the Train {Kohl's}
New Balance Shoes {Nordstrom}
DIY Car Applique - I picked up a clearance long sleeved shirt and hand stitched a felt applique over the teddy bear that was already there. Remember, I have to have everything tie into the theme!
DIY Crinkle Airplane - Aiden loved my crinkle tag robot so much that I had to make a replacement! It's filled with a plastic bag and baby wipes bag to make a crinkle noise. I was inspired by this cute little guy, but mine didn't come out quite as cute. So no tutorial here (unless you ask, then I'll post one!).   Changing threads probably would've helped. But when it's late at night, I want a quick project!

Despite the imperfections, I'm happy to report that Aiden likes the wonky mismatched thread crinkle plane!


linked up here:

Thursday, May 19, 2011

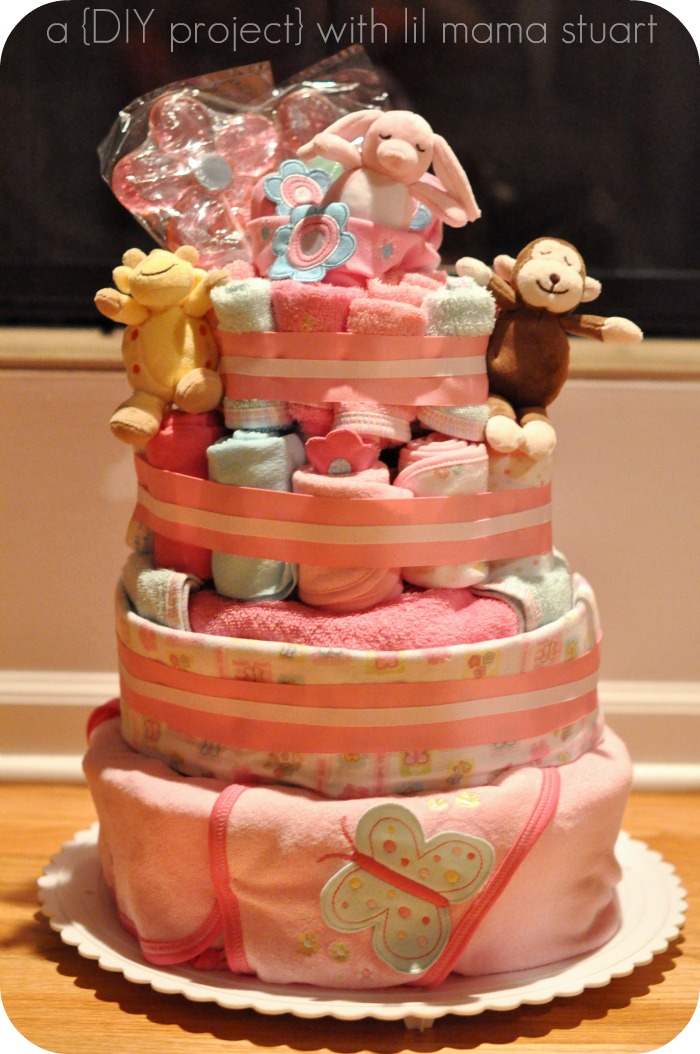
DIY Diaper Cake with Picture Instructions

I already showed you a diaper cake I made for Sandy's baby shower with a really lengthy tutorial without many pictures. Last week my old manager asked if I could help her make a diaper cake for my other old manager. And of course I agreed J

So here is another tutorial, that’s hopefully easier to follow with more pictures. Keep in mind no two diaper cakes are the same.

Basic Materials:
       1 box (96 ct) newborn or size 1 diapers
       1 wrapping paper roll or 2 paper towel rolls
       Baby girl hair ties or rubber bands
       String
       2 spools of ribbon (1 large and 1 medium width)
       1 cake stand/base
Optional Adornments/Gifts:
       1 hooded towel
       Numerous packages of burp cloths
       Numerous packages of wash cloths
       Numerous packages of onesies
       1 hat and socks set
       2 flower lollipops
       3 little jingly animals
Total Cost: ~$100
Total Time: 3 hours
Instructions:
1.   Roll each diaper and secure with hair tie/rubber bands. In the same manner, roll some wash cloths, burp cloths and onesies, trying to make them similar heights.
2.   Stand a bunch of diapers up and start gathering until they form a circle. Tie loosely with a string. Add more until you get desired shape and size. Make this your base (1).
3.   Cut wrapping paper roll in half. Remove two diapers from your base (1) where you want your support (wrapping paper roll) to go. Keep in mind that the support should go through the next two tiers (2&3), so place them towards the inside of the base (1).
4.   Repeat step 2 around your wrapping paper rolls making tier (2) smaller than the base.
5.   Fold towel lengthwise to be the same height as base (1). Wrap around base tucking the top over a row of diapers. Neatly fold excess towel underneath base so it lays flat. Our towel wasn’t long enough and used the matching wash cloth to cover the gap. Secure with pins. Make sure you tell Mom that there are pins in her cake!
6.   To cover the outside of tier (2), repeat step 5 with burp cloths. We also covered the top of this tier by sticking washcloths on top and tucking it in. 
7.   Repeat step 4 with wash cloths, burp cloths and onesies to make tier (3). Cut wrapping paper rolls so they do not extend above this tier (3). Remove a diaper from the center of this tier (3) and replace with wrapping paper roll. Repeat step 4 to make tier (4).
8.   For our topper, I put a diaper in each sock. Then they were able to stand inside the (upside down) hat. I removed a few wash cloths/burp cloths/onesies from the center of our top tier (4) to make room for the hat and stuffed it in.
9.   Tie wide ribbon around each layer of the cake. Secure with a pin. Tie narrower ribbon in the center of each wide ribbon. Secure with a pin.
10. We stuck the lollipops in the top and secured the little animals with a pin. They’re saying taa-daa! J
I hope this tutorial was easier to follow than my first one! What do you think?

linked up at:
Join  us Saturdays at tatertotsandjello.com for the weekend wrap 
 up           party!

Wednesday, February 2, 2011

Baby Shower Photog

I was asked to be the photog at my sister in law’s baby shower and I said of course, it’d be my pleasure! I will eagerly accept any opportunity to practice shooting. It also gave me the chance to test out the lighting situation before Mia’s party.

After doing the baby shower and christmas cards for my brother and friend, I am realizing that a good photographer requires more skills than getting the shot in your camera. To capture the natural moments, you have to be discreet and fade into the background so people don't notice you pointing your camera at them (once people notice you, the moment is gone!).  Yet at the same time you have to be comfortable enough to coach and give straightforward directions (to make sure you get the posed people shots) without making the subjects feel awkward. Sheeesh, it's tough and there's a lot to think about in those split seconds!

Some party details:
♥ The mommy-to-be’s friends made the tissue paper poms as decoration. There's a bazillion tutorials out there.
♥ The Guess the Baby Poop game was a lot of fun! You guess which chocolate was melted in each diaper. My favorite quote of the day...I was showing a dad a picture I took of a chocolate diaper, and he goes "You took a picture of my daughter's poop??!" lol - he didn't know about the game yet and frreal thought I took a picture of his baby's poo, ewie!
♥ The Chug from a Baby Bottle game is apparently harder than you think.
♥ Always love the Guess Her Belly Size game!
♥ The giveaways were adorable cupcakes from Deerfields.  I’ve had Deerfields cupcakes at two baby showers and I think they’re my fave so far. The icing is soooo good! 
{click photos to enlarge}


I made sure I made it into one picture, out of 300. We can’t wait for the newest addition to the family J  Mia will be so happy to have a cousin nearby!