Photobucket Photobucket Photobucket Photobucket Photobucket Photobucket

Wednesday, March 30, 2011

DIY Growth Chart

Hehe we were being silly during family time the other night J We always think its funny to see Mia’s big Korean head squished inside her hoodies. And perhaps she’s outgrown this outfit considering it’s bunching up at the knees haha.  But it’s sad how quickly she outgrows cute outfits and I hold out as long as possible before putting them away. L

Aaaanyway, while snapping away at Mia being silly, I caught her growth chart in the background, so here’s a DIY growth chart tutorial for $0!
  1. Cut out whatever shapes you want out of cardstock. I save cards (like the gift tags made here) and even tissue boxes haha. What!? They have cute designs! At first I freehanded circles. But then I bought a circle punch for her birthday party and now I use that.
  2. Write down date, height and weight. I used each doctor’s checkup.
  3. Pick out a spot on the wall. Measure your child’s height (we use 2 rulers if we’re too lazy to get the real tape measure), mark lightly with a pencil.
  4. Use double sided tape to adhere. Done!

Mia picks at them now and then but it’s not too often. And I always just tape them back up, which is why the pencil marking is helpful. You likey? Did you notice that you’re slowly seeing all the elements in her room?


linked up here:
Join  us Saturdays at tatertotsandjello.com for the weekend wrap 
 up           party!Visit thecsiproject.com

Tuesday, March 29, 2011

Mia's First Art Project

Last year for my birthday, Mia did her first art project. With Daddy! It was super thoughtful on Doug’s part and I could tell how excited and proud he was to have Mia do her first art project - stamping her hands on my birthday card. I was surprised to hear he dug up my acrylic paints and covered Mia’s hands in them! That’s not exactly what they’re meant for nor did I know if that was safe! But I know he had good intentions and Umma helped scrubbed the paint off Mia's hands. I am so glad he had our baby sign my birthday card with her 2 month old hands because now they hang up in her room next to her newborn foot prints J 
And now...look how much she's changed in a year!

Monday, March 28, 2011

Chicken Parmesan Recipe

Another easy peasy recipe for you – Chicken Parmesan. Even Mia liked it! She’s transitioning over to mostly table foods now and I am having a hard time thinking of what she’ll eat. So if you have some tried and true suggestions, let me know! This recipe is also pretty basic, so if you spruce your chicken parm up somehow, I’d love to hear what you do.

Ingredients (can be halved also)
4 boneless, skinless chicken breasts
1 egg, beaten in one dish
¾ cup Italian seasoned bread crumbs in another dish
1 jar pasta sauce
1 cup shredded mozzarella cheese
Oil for pan

Instructions
  1. Get pasta water boiling and cook according to package instructions.
  2. Pound chicken until even thickness (makes for an evenly cooked piece of meat). I like to place waxpaper or saran wrap over the chicken on my cutting board so juices aren’t splashing everywhere while I whack away with my mallet.
  3. Season with S&P.
  4. Heat enough oil to coat the bottom of the pan on medium high heat.
  5. Dip chicken in egg and then bread crumbs.
  6. Preheat oven to 400°.
  7. Place chicken in hot pan and brown for a few minutes (we’re not cooking it here, just getting the outside nice and crispy). Flip and brown the other side for a few minutes.
  8. Bake for 20 minutes.
  9. Pour pasta sauce over chicken. Top with cheese.
  10. Bake an additional 10 minutes until cheese is nice and melted.
I used to make this without the browning in the pan part – but it’s sooooo much better with a crispy outside J On a photography note­ - I was getting super frustrated and couldn’t think of how to get a creative delicious shot. Food staging is not easy people! Or I could use more garnishes. Enjoy!

Thursday, March 24, 2011

DIY Baby Tag Pillow or Blankie

Last summer while strolling through the city’s many festivals, I saw adorable baby tag blankets. Of course I touched them to admire the softness, looked at the price tag, and put it right back thinking I can so make that. Which made me feel bad that I’m not supporting other crafters. But why buy if I can do it myself! So nearly a year later, I crossed this project off my list.


Not gonna lie, this project took me three hours after bedtime. It would help if I had my sewing machine parts on correctly and didn’t have to waste 30 minutes on threading the bobbin properly. It also was my first time attempting an appliqué (using Heat’n Bond and an appliqué stitch on the sewing machine). I originally was going to make a blankie just like all the other ones out there.  But when I was done sewing, it was calling to me saying it would be the perfect addition to Mia’s other pillows. Here’s the breakdown…

Materials/Cost
2 types of fabric - $5-10
♥ get something soft for the baby, like minky/dimple dot fabric (use your 50% off coupon!) for one side and some other soft coordinating fabric for the other
♥ I bought a yard of the minky - which is waaaaaay too much. I could probably make 10 of these pillows/blankie with that much fabric
Scraps of coordinating ribbon - $4 if you don't have any on hand
Optional – appliqué: Heat’n Bond Lite (fusible web found at the cutting table) - $2 
If making a pillow – stuffing/pillow form
♥ I decided at midnight that this blankie will now be a pillow and didn’t have stuffing or a pillow form. So I scoured my fabric box for scraps and found a ton of ugly colored fleece = free! J
*Keep in mind the prices above reflect my actual purchase, and not necessarily how much for the one pillow/blankie. I’ll have a TON of leftovers for other future projects I haven’t dreamed up yet.

Time: 3 hours – I’m being honest here. It shouldn’t take you this long, but I was kind of winging it, like most of my one off random projects.

Instructions:
  1. Wash fabric. Do it right when you get home from the craft store. So when you have the urge to craft at 10pm like I did, you’re ready to go.
  2. Cut desired pillow/blankie size + 1 inch out of each piece of fabric. My pieces were 12x12 for an 11x11 pillow/blankie.
Optional – appliqué (If not doing this, skip to step 9)
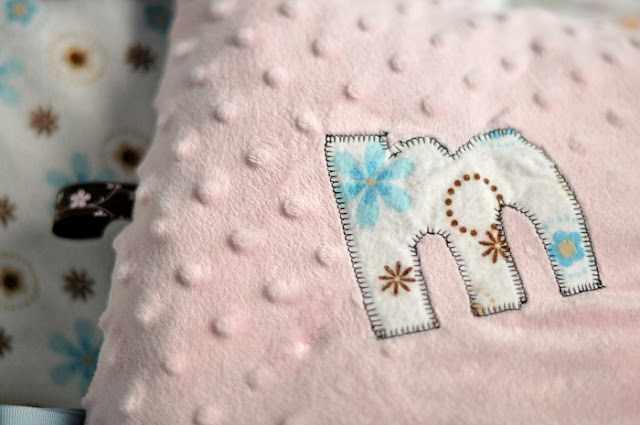
  1. Cut a square of fabric large enough for your desired appliqué (could be an initial, an animal, whatever you want). Mine was probably 5x5 for the letter “m” on my 11x11 pillow/blankie. My appliqué fabric was the same fabric as the backside of my pillow/blankie.
  2. Cut the same size of your Heat’n Bond. Follow instructions that came with your fusible web to attach the two together.
  3. Draw your shape on a piece of paper and cut it out. I free handed my “m”.
  4. Put your cut out shape face down on the Heat’n Bond (because the Heat'n Bond will be the backside of your shape) and trace . Discard paper. Cut your shape out of your fabric. Turn it over and your fabric side should correctly show your shape.
  5. Follow instructions that came with your fusible web to adhere shape to pillow/blankie. Since this was my first time, I could use any tips you have. My letter “m” didn’t adhere that well to the minky fabric, but I didn’t mind since I knew I’d be stitching it on later. *TIP* I unintentionally ironed out some minky dimple dots when trying to adhere my appliqué L  Try and avoid doing that.
  6. Look in your sewing machine manual for an appliqué stitch. Stitch all around. My rounded edges aren’t perfect, but whatevs.

Back to the pillow/blankie…
  1. Then I roughly followed this tutorial. There’s a ton out there if you Google it. I don’t like too many tags so I just placed three ribbons on each side in varying patterns, widths and textures. I probably should’ve reinforced my seams, since Mia may be tugging at the ribbons a lot. But I need instant gratification and moved on with the project.
  2. After I flipped my piece right side out, it screamed “I should be a pillow with the others in Mia’s reading nook!” That’s when I went looking for something to stuff it with and found scraps of ugly fleece. After stuffing, I used this ladder stitch tutorial to sew that baby shut.
Ta da! 3 hours and 10 steps later (ha!), a super cute DIY baby tag pillow for Mia J Then it was time for bed. At 1am. I think the second time, it should go quicker. I hope. I plan to make baby tag blocks too…just add that to my always growing never remembering what’s on it because there’s too many fun ideas project list.
linked up here:
Visit thecsiproject.com

Wednesday, March 23, 2011

Teriyaki Chicken Thighs Recipe

Last week I said there’d be recipes, so here’s one for Teriyaki Chicken Thighs from the Food Network. I usually have all the ingredients as you can see here. I use regular vinegar because that's what I have on hand and omit ginger because I don't like it. All you have to do is marinate (for a few hours), broil, and dinner is ready in under 30 minutes. Even better when you have kimchi J


Tuesday, March 22, 2011

DIY Tutu Tutorial from Two Yards of Tulle for $2

Say that ten times fast. Ok I didn’t write up the tutorial, but that was a fun title. J I don’t like to post gifts before I give them, but Mia’s birth story was featured on Spearmint Baby today and I have lots of new mama visitors who might be interested in easy DIY projects...Hi there! Take a look around and stay awhile J

I was telling my SIL how I’ve been dreaming up photo shoot set ups for her baby girl (who’s due to be here tomorrow!). And just like most of my art projects, ideas have been running around in my head like crazy! When Mia was born, I didn’t know how to use my camera like I do now, nor did I know how to handle an itty bitty fresh out of the womb baby.

But now…I can’t wait to prop this baby girl up all over their gorgeous house and snap away! J Anyway, my SIL mentioned that she liked pictures of newborn baby girls in tutus, and I said – I can make those too! J

Samster Mommy has a good tutorial for a 10 minute no sew tutu.  Here’s what I did differently:
  1. I couldn’t find rolls of pink tulle, perhaps because Easter and wedding season is approaching. So I bought 2 yards of pink tulle off the bolt from Joann. Of course I had a coupon, so it was only $2. Keep in mind my tutu is for a newborn, so not that much tulle was needed.
  2. I didn’t have a handy chair like hers to hold my elastic taught, but a Metamucil container seemed to work wonderfully.
  3. I bought one bunch of flowers from Michael’s to embellish the tutu, probably $1. I snipped the flowers off, with about half an inch of stem left. Then I tucked a stem into a knot, repeating all around the tutu. Doug said it looked like a Hawaiian skirt, so I added a ribbon to finish it up and to make it less luau like.

And there you have it - DIY no sew tutu tutorial using 5 materials, for less than $5, in minimal time using only cutting and making a loop skills.  I hope it fits and it’s not too bothersome for the little one. I can’t wait to take her newborn pics! Now all we need is for her to arrive so I can take them, haha.
linked up here:
Visit thecsiproject.comlinkparty

Monday, March 21, 2011

Paper Culture Thank You Cards

I raved about Paper Culture before and they impressed me again!

I saw some thank you cards and thought they were so cute and perfect for the Winter One-derland! (Are you sick of the party yet? Don’t worry - this is the last you’ll hear about it, I promise!) But passed on getting them since I didn’t want to pay that much and was still debating about making my own. But then Paper Culture had me fill out a survey and I received a $15 credit. That sold me haha. And the fact that I didn’t come up with a design yet on how to make my own. Aren’t they sooo cute though? Even Doug thought so. How could we resist?


A few days after I placed my order, they informed me that my shipping was upgraded for free and I'd get my package a few days earlier! What a pleasant surprise! And then when my pretty little box of cards arrived, Paper Culture wooed me again with a 20% off coupon! I’m such a sucker for good service. And coupons haha.


The little family was perfectly adorable as is, but the color wasn’t exactly what I hoped for. So I had to personalize it a little and give it a little ooomph. And make a baby girl penguin J With ribbon scraps. Speaking of which, I was shocked (ok I was moreso sad) that my SIL threw out all the ribbon from her Guess Mommy’s Belly Size Game. She asked what I would do with scraps of ribbon anyway?! Dah! I should write up an entire series of posts just for that! In true crafter fashion…I must. save. everything!

Thursday, March 17, 2011

DIY No Sew Crib Skirt

After Little Beans Café, all three of us went to Joann so I can gather enough goodies to cross some art projects off my list. It was so cute to see Mia scoping out the scene from the top of the cutting table and to slowly wander the aisles - that’s mah girl! J This project however didn’t even involve anything I bought. It actually wasn’t even on my list of near future to-do’s haha. I get sidetracked very easily…

My SIL has graciously given us a ton of hand me downs from Ryu and Kira, but the crib skirt was bugging me. It didn’t match the rest of the room and I can’t help being a matchy matchy person! As I was working on a tutu for the newest baby girl, expected any day now, my crafty scatterbrain walked into Mia’s room for some reason, then my fabric stash for some reason and all of a sudden I was working on a new crib skirt! I told you I get sidetracked very easily. I didn't even finish the tutu that day! But I did make a crib skirt, which isn't easy to find without buying a complete bedding set.

Here's my 3 materials, 5 step, 30 minute, no sew tutorial for a crib skirt. If you can cut a straight line and tie a bow, which I believe you had to master in kindergarten, you can do this...

Materials/Cost
Fabric - I’m guessing a yard would do? I used leftover fabric from the Winter One-derland. $0!
String/Ribbon - I used scraps of whatever I had on hand from the edible pacifiers. $0!
Pinking Shears – Thanks Santa J $0!

Time: 30 minutes

Instructions:
    1. Measure the length of your crib. Measure the height (to the springs) of the crib. Add an inch to the height and cut one piece using pinking shears.
    2. Measure the side of your crib. Use the same height + an inch as in step 1. Using pinking shears, cut two pieces.  Now you have three pieces, one for each side. My crib is against the wall so I didn’t need a fourth.
    3. For each piece: fold your fabric over that extra inch. Snip a slit about an inch from the inside of each end. I also made a slit in the middle of the long piece.
    4. Place your string/ribbon in each slit.
    5. Tie to the corners of the springs of the crib! This is what took the longest. It’s not easy to tie a bow when you have to squeeze your hands through those bars.

Easy right?! I suppose if you wanted to do it right (and use a sewing machine) you could (iron your fabric, whoops) hem each piece. You could even get fancy and gather it for a ruffle effect or add trim yadda yadda. But this was just a quick fix to ease my "that thing doesn't match all the other stuff and everything needs to be perfect" issues. Pictures of the whole room eventually, I swear!

linked up:
linkpartyJoin  us Saturdays at tatertotsandjello.com for the weekend wrap up
    party!

Wednesday, March 16, 2011

Hawks Beat San Jose 6-3!

Doug and I went to the Hawks game yesterday and it was AWESOME! It was my first hockey game ever and it couldn’t have been any better! We had a drink at the Ketel One Club before heading down to meet Coach Q.  Just being in the hallways of the locker rooms was cool! J Since we had no idea we were going to the game until that day (thanks Grandma for working overtime on short notice!) and went to the UC right after work, I didn’t have a chance to go home and get my camera! L Photos taken with a BB... 

Coach Q came to talk to me, Doug and my two bosses. Cool! One on one time! And he was so nice and surprisingly soft spoken underneath that intimidating stache! We talked about the visit to the White House, his ulcer, the need for this win since we've lost the first three times we played SJ and Niemi being on the other side.   

Then we headed up to our 100 level row 11 seats with beers and hot dogs in hand J My kinda dinner! Doug and I were so excited to be up close to the action. The players looked so crisp! At one point I told Doug, “It’s cold in here.” And he’s like, “Duh, this is an ice rink.” Lol I suppose.

We were down 2-1 at the end of the first period, but came back strong in the second. It was awesome to have them score most of the goals on our side of the rink! The five goals were the most for the Hawks in any one period this season. Toews set a career-high with his 70th point while Kane’s goal was his 100th. Glad we could be there for these milestones! In the third period you could tell the Sharks were hustling and the action was much quicker, but the gamed ended 6-3. Before last night, the Sharks hadn’t lost a game by more than a single goal. These sports stats make Doug love me more J

Tuesday, March 15, 2011

Little Beans Cafe

We didn’t have anything planned this weekend, so we decided to take Mia to  Little Beans Cafe on Saturday. Ok, so I was really scoping the place out to see if it’ll be the venue for her 2nd birthday party. Haha, I know you think I’m crazy. But I’m ok with that. Everyone knows what a crazy planning family we are. J But seriously, the earlier you plan, the less stressful and cheaper it’ll be!

Since some of you come here looking for pictures of Mia, here you go! She didn’t particularly look like she was having a ton of fun, maybe because there were a lot of bigger kids running around. But I’m sure she enjoyed getting out of the house for a bit.

The play space is way bigger than Family Grounds Cafe and the prices are equivalent. The parking is way easier at Little Beans also. There were a ton of different play areas: crawlers only space; dollhouses; a firehouse complete with slide, firetruck and dress up props; a grocery store; a play house; tons of props to play dress up; an auto shop, desks/books, and train table.
I loved all the little details…the grocery store had an ATM outside; the play house had a mini piano, oriental rug, and mantle complete with fireplace and mirror on top; and the autoshop had cars, tools and a gas pumping station!Check out Mia with a tutu from the dress up stash on her Beamer outside the auto shop! This place would be great when your kids get cabin fever on a cold or rainy day and need to run around to let all that energy out.
On a photography note, when shooting toddlers with adults everywhere, it's easy to get a lot of crotches in your shot when you're down at a toddler level. Be careful of what's in the background of your frame!

Monday, March 14, 2011

Spring Is Around the Corner

The birds are chirping, the days are getting longer and the breeze isn't so cold.  Flowers have even popped up in Mia's room! J To my delight, I was able to get some art projecting done this weekend. I ordered decals from this etsy shop (for $3 each!) back in December, and just finally got them up. Mia's room is almost ready for a reveal...a year later, ha. I just need to find the perfect scrapbook paper for her shelves...

There will be a little of something for everyone this week - pictures of Mia, DIY art projects and recipes...

Wednesday, March 9, 2011

White Chocolate Coconut Bars Recipe

{pictured on the plate in back}
I was looking for a basic brownie recipe for Mia’s birthday party and came across Eagle Brand’s Magic Cookie Bars.  I adapted the recipe by:
1. Using white chocolate chips (because of my white/winter party)
2. Not using nuts (since there were kids at the party) and
3. Using a 9 x 9 pan (to have a thicker crust)

They’re super easy to make. But consider yourself warned, they are very sweet. But I love white chocolate, condensed milk, coconut, and have a sweet tooth, so I’m ok with it J

Ingredients
No Stick Cooking Spray
1 ½ cups graham cracker crumbs
I don’t like cleaning my food processor/blender, so I stick a bunch of crackers in a sandwich bag, and smash away with a mallet or pan
½ cup butter, melted
1 (14oz) can Eagle Brand® Sweetened Condensed Milk          
2 cups (12 oz. pkg.) white chocolate chips
1 1/3 cups flaked coconut

Instructions
  1. Heat oven to 350°F.
  2. Line a 9 x 9 inch baking pan with foil and cover with no-stick cooking spray.
  3. Combine graham cracker crumbs and butter in small bowl. Press into bottom of prepared pan. I use the bottom of a measuring cup to smush the crumbs down.
  4. Pour sweetened condensed milk evenly over crumb mixture.
  5. Layer evenly with chocolate chips and coconut.
  6. Bake 25 to 30 minutes or until lightly browned.
  7. Loosen from sides of pan while still warm; cool on wire rack. Cut into bars.