Photobucket Photobucket Photobucket Photobucket Photobucket Photobucket
Showing posts with label blogging tips. Show all posts

Wednesday, June 26, 2013

Google Reader Replacement

Ah yes, the day Google Reader will be no more {July 1st!} is quickly approaching. Dun dun dun! How will you keep up with all your blogs!? I easily transferred my daily blog reads to feedly.com which also syncs to the app on my Android phone. So if you haven't yet, click that big green button on my sidebar to add me to your feedly to keep up with my photography, parties and DIY projects! You can also subscribe via email {on my sidebar}.
follow us in feedly

Tuesday, May 1, 2012

How to Make a Blog Button Tutorial

Have you seen my {recipes}, {DIY projects}, {parties} and {photo shoot} pages lately? Instead of text links, I made my pages easier to navigate with visuals of each post, which you can click on to go directly to that post. What do you think? I especially love how you can see my {Getting SO Big} babies change throughout the year.

Yesterday I showed you how to watermark an image without using Photoshop. Today I have a tutorial on how to make your own blog buttons/picture tiles with active links.  

Note 1: My blogging platform is Blogger, which uses Picasa for hosting pictures.
Note 2: I have no experience with html but have taught myself some basics through 2 years of blogging. 

  1. Go to fotoflexer.com and upload your image.
  2. Crop image to desired dimensions. Buttons are typically a square. Unlike picnik.com, there's no option to crop to a square so I eyeballed it. Then I clicked on resize, UNchecked the "keep proportions" box, and made the dimensions equal (to be a square). My initial guess was close, so distortion is minimal.

  1. Add text if you want.
  2. Save it to picasa (or your photo hosting site, instead of your desktop). I made a separate picasa album specifically for thumbnails for ease of access.
  1. Open up your post/page where you want the button to go and use the following code in “edit html” (not “compose”).
<a href="http://YOUR LINK HERE.html"><img src="https://IMAGE LINK HERE.jpg" width="183" /></a>
Note 1: There are three highlighted areas:
                                                              i.      The link you want to send the reader to, ending in .html.
                                                            ii.      The picture that you want to be shown with the link, ending with .jpg.
                                                          iii.      The width of the button/image. See note below.
Note 2: Buttons are typically 150 x 150 (to easily put on sidebars). I have my width set to 183 so that I can stack 3 images on one line because the width of my body is roughly 550 (=183x3).
You should know what the width of your blog body is or just play around with different numbers until you get the size you want.
Note 3: My friend Christine’s post taught me the difference between “curly” and “straight” quotations. Check this post if your button doesn’t work. Christine also tells you how to write your code for others to grab and use your blog button. 
  1. Go to picasa and select your square picture from the album you saved it in.

  1. Click the picture to view it full size. 
  2. Right click and select “properties”.

  1. Copy the “URL/address”, which should end in .html. Double click on the address to select and copy the entire URL because the URL is longer than what is shown (which is why you can't see the ".html" below).

  1. Paste the address of the picture into your code where highlighted. 
  2. Paste the address of the link you want your reader to go to into your code where highlighted.
<a href="http://YOUR LINK HERE.html"><img src="https://IMAGE LINK HERE.jpg" width="183" /></a>

Test it out! Click on your picture. Does it go where you wanted it to? If not, double check your code to see if you missed something. Ta-da! You just edited some html and made a blog button (picture that when clicked, directs your reader to a link).


linked up here:
Home Stories A2Z Live, Love, Travel 

Sunday, April 29, 2012

How to Watermark Images Without Photoshop

With picnik.com closing and becoming a Google product, a lot of bloggers are stuck looking for online photo editing alternatives. Aside from designing basic party printables, I relied on picnik for watermarking images on my blog. Today I'm incorporating ideas from MADE and Kent Weakley to show you {in less than 10 steps} how to (1) download free fonts, (2) create a .png watermark file with transparent background and (3) how to watermark an image without Photoshop. 
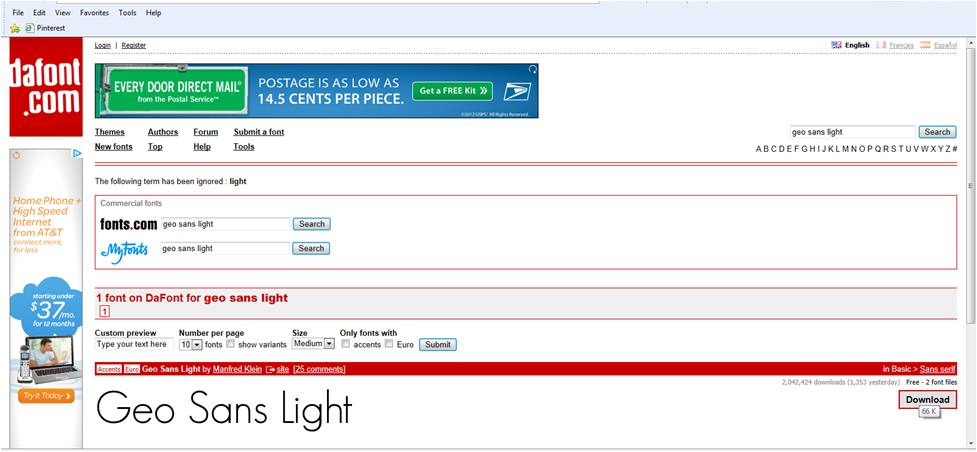
PicMonkey and ipiccy are free online photo editing sites, but they don’t offer the font I use to watermark on my blog (Geo Sans Light).  Fotoflexer.com doesn’t have my font either, but it does allow adding an image (my watermark) as a layer onto an existing image (the image I want to watermark). PERFECT! Fotoflexer also integrates with Picasa and other sites, which makes it easy to create your own blog buttons {as a blogger/blogspot user}. Come back tomorrow to learn how to make your own blog button.
  1. Download font {for FREE from dafont.com or another source}.

  1. Install font on computer: I'm on Windows 7 and all I had to do was unzip the files I downloaded and right click on "Install".

  1. Create watermark in Microsoft Powerpoint: Insert text box. Type using your new font. Resize as big as you can. Change colors as desired. I like my watermarks to be white, but left it black in the following steps so you could see my text.

  1. Make background transparent: Right click on the text box à click on the paint bucket à select "more fill colors". At the bottom, set "transparency" to 100%


  1. Save the text box (not the powerpoint file) as a .png file: Right click on the edge of the text box à click on "Save as Picture". Select "png" from your drop down of file types.


  1. Upload picture to be watermarked to fotoflexer.com. My picture is already fully edited and just needs a watermark. If you need to edit yours, do so now.
  1. On the "Layers" tab, click on "Add images." Select your .png watermark file. Adjust the size and placement. Change the opacity if you want. 


  1. Save, done!

You only have to do all the steps the first time. After you have your watermark .png file saved, you only have to do steps 6-8 when you want to add your watermark to images.

See! Who needs Photoshop!? Just kidding, I would love Photoshop. Would you like to contribute to my Photoshop fund?? My husband would appreciate it. J


{linked up with Tatertots & Jello} and:
Home Stories A2Z

Thursday, September 8, 2011

BlogHer Conference Newbie Tips

If I were a newbie to an enormous blogging conference, here’s what I’d want to know beforehand:
  1. Everyone is just as nervous as you are.
As my social media expert of a best friend suggested, I searched #blogher on twitter (even though I don’t have a twitter account) to see what other people were saying about the conference. This led me to plenty of articles where past attendees posted what they learned. The commonality being – everyone feels just as nervous and insecure as you. It will not be like the high school cafeteria, people will talk to you and no one will care what you wear. In retrospect, it was fine and there was nothing to be anxious about.  Everyone is there to meet new people. And honestly, I met more newbies than recurring conference goers, which made me feel better that everyone was in the same boat.

  1. Reach out to people beforehand.
Find out who’s going. Search twitter. Search your Google reader. See who has a BlogHer logo on the blogs you normally read. Then reach out to them. I emailed a dozen people whose blogs I normally read to say that I’d love to meet them. Some replied, some didn’t.  Some were going, some weren’t. I even reached out to DIY super stars Jen from Tatertots and Jello and Shelley from The House of Smiths. And then when I spotted them, I wasn’t just any stalker reader. They already knew my name and blog and that I wanted to meet them J

  1. Walk up to people and introduce yourself.
Yes, obviously we’re all there to network. But it always takes me a few mental tries before mustering up enough courage to walk up to someone and start talking. Sure, it’s always awkward to not know anyone in a room full of people who are already talking to one another. But just do it. Ask what they blog about, where they’re from, what sessions they went to, etc. It's also helpful to know your own elevator pitch

  1. Similarly, if you recognize someone, go say something!
Opportunity 1:  I caught a glimpse of who I thought was Penny de los Santos (I already told you how excited I was to hear her). But I kept walking, thinking “Was that her? That has to be her. Should I say something?” I proceeded to walk and said to myself, “ Dah! I should’ve told her how I was so inspired by watching her live streaming seminar and that I was so excited to hear her speak today.” But I didn't, wah wah.

Opportunity 2: I recognized Jaden Hair of Steamy Kitchen on the speakers list and love her food photography tips, which I also already told you about. Like I mentioned in tip #2, before I left, I reached out to her. And she replied saying I’ll have a blast and to attend the newbie breakfast. On the first day, I saw her in passing, but wasn’t sure if it was her and moved right along. Later on, I saw her again, and I swear that was her, but kept on walking. Ok this happened like three more times and I never said anything! Ugh, stop being such a scardy cat! I did attend her session though and asked a question and followed up with her afterwards (via email). And although she’s a busy woman with two kids, columns to write for and TV shows to appear on, she replied saying that I better introduce myself next time!

Opportunity 3: In the bathroom, (like a creeper) I thought I recognized Rebekah from A Blissful Nest, but didn’t say anything. Then while getting lunch, I saw her again and was pretty sure that was her. Thinking about opportunities 1 and 2 that I already let pass me by, I just said “Go do it!” and introduced myself. Good thing I did beacuse we ended up talking all through lunch and now she has a face to put to all the comments I leave on her blog. She even featured me!

Opportunity 4: I noticed that someone had been eyeing me for awhile. She finally came up to me and asked if I was the woman behind Don't Speak Whinese. Yes, I know Asians may look alike J But I didn’t care that I wasn’t who she thought I was. I’m glad she finally came up to me and I hope she found the blogger she was stalking looking for!

  1. If you don’t like a session, leave.
One session was just not for me. Rather than waste time pretending that I was interested, I just left and went to a different session. This worked out perfectly because that’s where I found Jen and Shelley, who I reached out to beforehand to hopefully meet them! I also didn’t see any pertinent sessions the second afternoon and headed over to the Queen Bee Market instead. Check back tomorrow for lots of pictures!

  1. Leave A LOT of extra space in your suitcase and hit up the Expo early.
You will get free stuff. Lots of it. I didn’t stop to talk to too many vendors at the expo, yet I still went home with a suitcase full of swag. No joke, my belongings aren’t even in here...just a ton of free shit, yippee!

I also found that company reps were most interested and enthusiastic to talk to me earlier in the day, as opposed to the end of the day, where they are exhausted from being on their feet all day giving the same spiel for the thousandth time. So if you actually want an engaging conversation about their products, don't go late in the day.

  1. Wear comfortable shoes.
This is a conference. At a convention center. There is a lot of ground to cover between the breakfast/lunch area, keynote rooms, breakout sessions, sponsor lounges, Expo, your hotel, cocktail hours, and late night parties. Not to mention you’re toting around your purse, camera, and bags of free stuff (see #6 above) while you trek around all day.

  1. You don’t need your laptop.
Unless you like to take notes on your computer or feel the need to be digitally connected at every breathing moment, you’re probably fine without your laptop. iPads and fancy phones are enough to keep you connected to Facebook, twitter, your blog, and the blogs of people you just met.  A computer will just be an extra thing to lug around on your already aching shoulder and feet.

  1. Tweet.
“Do you tweet?” was a common question people asked. And I don’t L Which means missed opportunities to connect with people. But I’m ok with not having another social media outlet to suck time out of my day.

  1. Don’t stress about not having an increase in traffic/followers.
Just like Lori said in her recap, don’t worry if after the conference, you don’t have an increase in traffic and followers. Let’s be honest, of the 60+ business cards I collected, I didn’t check half of them out. And of the ones I did check out, although great to meet, maybe their site isn’t aligned with my current (blogging) interests. So people are probably doing the same to me. Which is fine. Because you’re a loyal reader, right? J

For any newbies heading to NYC for BlogHer’12, I hope these tips help! Or Haven, or *SNAP!, or the Creative Connection. Ha, there’re a lot of conferences out there to meet face to face with the people you know so well from behind your favorite blogs!  Don't worry, tomorrow's the last you'll hear about BlogHer'11...you still with me?

Tuesday, September 6, 2011

BlogHer’11 Recap

Annnnnd I’m back! I’ve been lazy procrastinating sleeping on Mia’s floor at 9pm every night instead of blogging, editing pictures and crafting. Bad habit, I know. But I enjoyed sleeping at a decent hour for a month once. The other day Doug said that my blogging career is over. And to that I say, HMPH! So where was I? Oh yes, BlogHer…month old news by now, but here goes so I can move on with my blogging life!
Thanks to PaperCulture, my United Miles and Doug’s Hilton Points, I was all set to go to a women’s blogging conference. In four days. By myself. Among 3,500+ other attendees! I was both nervous and anxious…Who am I going to talk to? What am I going to do for dinner? Will I just be a loner standing in the corner of a room full of confident women who already knew each other? However, reading other people’s posts about past BlogHer conferences reassured me that everyone had these same pre-conference jitters

I arrived Thursday night and headed straight for the first BlogHer cocktail party at the Marriott. Then first thing Friday morning was the newbie breakfast. It was reassuring to know that there was such a large number of first time conference goers. Throughout the next two days, I attended seminars on:

Writing/editing - Along with pracitcal writing/editing tips, I was advised to "Never trust a person that doesn’t say sh*t."

Penny de los Santos on food photography – I watched one of her live streaming workshops, told you about her here, and was so excited to hear her in person. It was more than how to photograph food (which disinterested some attendees), growing as a photographer, finding mentors, and showing your work to anyone who can give constructive feedback.  It was about a way of life. Capturing human moments. Connecting. Transporting people to a place to feel something. Finding places in your life that inspires you. Telling a story. Reacting to your instincts. Surrounding yourself with people that challenge you. Penny is such a humble and inspiring speaker. I need to refresh myself of these objectives as I strive to make beautiful photographs.

Great blog design – This was such a fast moving, visual, straight to the point seminar. So many helpful tips and keep your attention personality from Cynthia. Get the full resource list here

Local heroes – I mentioned before how I loved seeing how Jaden Hair from Steamy Kitchen got her “money” shot of her food. So I was glad to her as a panelist.  I heard how she and others made it “big” from being a nobody. Jaden doesn’t have a culinary background, but by doing her research, becoming an expert in her field, and finding her unique point of view, she has two cookbooks, is a columnist for Discovery Health and TLC and has been featured on a ton of TV shows and websites.  All from contacting a small newspaper and TV show to write/appear for free. To practice. And bigger and bigger papers and TV shows called. It’s amazing to hear how determined women are to get to where they want to be.

Just like most attendees, I went to BlogHer to be inspired. That is after all, what I love most about the blogging community. Everyone is supportive of each other’s ideas/businesses and wants to spread the love to see others grow and succeed.

My most inspiring takeaway came from Indra Nooyi, CEO of PepsiCo, also known as the #1 most powerful woman in business by Fortune Magazine from 2006-2010.  Aside from hearing her views on how companies and governments should work together, Pepsi’s balanced portfolio, society and obesity, and the five necessities to being a leader (1 competency - being a lifelong student, 2 courage and confidence - to speak out, 3 communication skills, 4 consistency, and 5 integrity), this is what I’ll remember most:

Being raised in India, she studied all the time due to a strict upbringing where she had to be the top of the class. Her mother wanted her to dream, yet be married off at a young age as custom would have it. But her mother decided that if she got good grades, she could delay marriage. So Indra went on to Yale’s Businesss school, then the Boston Consulting Group, Motorola and others before arriving at Pepsi. Indra shared a story on how she kept missing a parent coffee hour with her daughter’s classmates. After her daughter brought this up, Indra replied,

“Do you want me to quit and stay home?” (In a positive, I’ll do what you need me to do, kind of way.)

Her daughter replied, “No, Mom. You worked so hard to get where you are today. Follow your dreams.”

What resonated so deep with me is how Indra’s mother instilled the value of following your dreams, and the message ran deep through to her own daughters. There’s a high probability that Doug and I will disagree with where Mia wants to go to college and with what major she will choose. (Yes, we are aware that is faaaaar from now.)  But I hope we can agree to raise our children to do whatever it is that makes them happy, no matter how far reaching and irregardless of the financial compensation. Catch Indra's full keynote here. Thanks for making it through this post and my month long hiatus!


Wednesday, May 18, 2011

Replying to Your Comments

Now that I have more followers (hooray! Thanks for reading J) I also get more comments. Which I love to hear what you think, keep ‘em coming! And I want to reply to you and say thank you. Or answer your question. Or ask you a question. But for those of you with Blogger accounts, some of you don’t have an email linked to your profile. Which means I receive your comment as an email from “YourNameHere noreply-comment@blogger.com.” I’m guessing you didn’t know that? Or you want to remain anonymous because of creepers out there, which is totally understandable. But I didn’t know about the noreply-comment thing until I read Darcy’s better blogging posts. Read this so I can reply to your comments please! It makes connecting with others so much easier! And then I don't have to stalk you to find out your email. jk. kinda. J

Tuesday, April 26, 2011

How to Watermark Your Photos

You may have noticed that lately, my pictures have been collaged and/or watermarked. If you’re wondering how to do it too, I use www.picnik.com. It’s free! I use it to resize and edit my photos before uploading to blogger. 

As I imagine most blog surfing crafters do, I save pictures of projects that I like to my “Ideas” folder on my computer for inspiration later on (not to steal them and repost or anything like that without giving credit where credit is due - because that's just wrong).  It’s always helpful when the creator has their website marked on their photo so I can go back to their tutorial and/or give them credit for getting my creative wheels going. Now that I’m getting picked up in more Google searches (woohoo!) I decided to do the same so you don’t forget me if you’ve saved my pictures for inspiration J

Check out how to watermark your photos (it's super easy) with this tutorial from Darcy. BEFORE watermarking your photo, I would recommend editing and saving it. THEN watermark it and save it under a new name. I say this because you may not want a watermark on your photo when you print it or use it for something else. This way you don't lose all the editing that you did to your photo. I learn things the hard way!

Tuesday, February 15, 2011

Blogger Tip – Picasa and Flickr Limits on Pictures

When I tried uploading pictures to my blog the other day, an error message popped up saying I was about to exceed my Picasa storage limit of 1GB (1024 MB). Umm I didn’t even know there was a limit! It is always advised to resize your pictures for the web because it is unnecessary to post huge files and it slows down your site when loading.  I never listened to this piece of advice because I figured I don’t post that many pictures.  Well now I realized I should’ve listened! 

Google suggested I could purchase additional storage (20GB for $5/year, 80GB for $20/year, etc). But since I want to keep this hobby as free as possible, I’m not going that route. Darcy at Life With My 3 Boybarians has a good tutorial on how to resize images for the web. So going forward I’ll resize my blog pictures with picnik (free) before posting.

I’m also considering uploading to flickr and getting the html from there to post in my blog, but I'm not sure I’m going this route yet. While uploading 100+ party pictures to flickr last night,  I got a warning message saying I was going to exceed the monthly upload limit of 300MB worth of photos each calendar month. GRRR! Nobody told me about that limit either! Also note that your upload limits are reset to zero at midnight in Pacific Time Zone on the first of each calendar month. You can't recover any of your monthly allowance by deleting photos. BOO! L If you have a free account, you'll see your limit on the upload page. And just like I learned the hard way, flickr suggests to: resize your images to be more "web-friendly" (like 300KB instead of 5MB).

Annnnnd that would be what’s holding up this Winter One-derland recap!! Sorry, it’ll be up before spring comes, I promise! No really though, hopefully this week…I’m workin’ on it!