Photobucket Photobucket Photobucket Photobucket Photobucket Photobucket
Showing posts with label party ideas. Show all posts

Monday, April 21, 2014

Little Man/Bow Tie Themed 1st Birthday Party

In addition to photographing Baby Corby as he got SO big throughout the year, I put together a party plan with ideas for his Little Man/Bow Tie/Newspaper themed 1st birthday party. I loved how his mama pulled it all together!
Invitations always set the tone for an event and these custom newspaper invitations could not be more perfect!

Speaking of custom, how amazing are these custom party favor cookies!? The caricature is spot on from Corby's 9 month photo session!

If there's any time to display pictures of your baby, their first birthday party is the time to do it! Corby's mom used her fireplace and mantle to the fullest to display photos of Corby throughout his first year.

A craft punch was super helpful in creating a bazillion bow ties and mustaches to use throughout the party.
Corby's mama had newspapers on display from the day Corby was born. And she came up with fun games like "Scatter-Corby's".
Awesome job mama! For more little man/bow tie/newspaper themed birthday party ideas, you can follow my pinterest board here.

Sources:
Party Plan & Photography - a {day} with lil mama – me!
Invitation – Lily Red Studio
Custom Cookies - Parker's Crazy Cookies

Monday, February 10, 2014

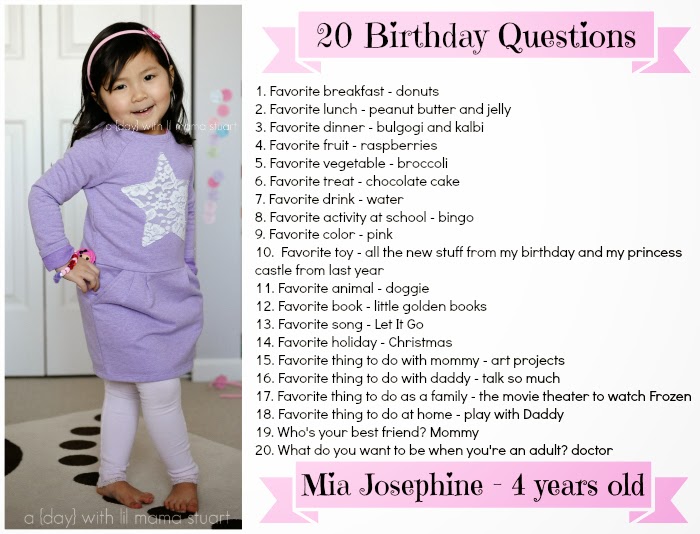
20 Birthday Questions to Ask Your Kids

Last year we asked Mia 20 questions on her birthday and here are her answers this year...
This little lady speaks, thinks and acts like such a big girl and we couldn't be more proud. The day after her 3rd princess ballerina birthday party last year,  she decided she wanted a Lalaloopsy 4th birthday party. Surprisingly, she didn't change her mind throughout the entire year so a Lalaloopsy party it was. Check back soon for DIY details from the party!

Wednesday, September 25, 2013

Giveaway #3 of 5! uh oh pasghettio

**We are on day three of my blogiversary giveaways! Don’t forget to enter here to win $25 to use on Premier Designs Jewelry and here to win $60 worth of Relished Foods.**

Just like the first two giveaways, this third one supports local entrepreneurs. Up for grabs today is an 8x10 print of your choice from the designs available at Uh Oh Pasghettio.

Uh Oh Pasghettio seeks to capture an authentic picture of life with kids: it’s vibrant and humorous and sometimes it’s sticky…but at its core, it’s beautifully simple and wildly entertaining. Uh Oh Pasghettio is led by two women who have worked together in marketing, design, and business development for years. After helping a number of other entrepreneurs launch and grow their businesses, we decided it was time to truly work for ourselves. So, we created a company where we both get to follow our passions and excitement every day - Amanda as Chief Creative Officer and Kim as President and Marketing Director. Many of our prints begin as hand-drawn creations, including pen drawings and watercolor paintings. You can personalize our prints by name, and match them to your décor with the option of customized colors. All wall prints are printed on a beautiful thick paper that looks gorgeous in a frame, and it won’t fade with sun or time.

I love uh oh pasghettio’s fresh and modern look with a touch of whimsy. Wouldn't you want one of these custom alphabet art prints for a little one's nursery?

Or perhaps artwork for a kids playroom or gallery wall?

I also love these party invitations for adults, a little man or little ballerina...

Use the Rafflecopter widget below (or click the Rafflecopter link if the box doesn't show up) to enter to win  8x10 print of your choice from the designs available at Uh Oh Pasghettio. Giveaway ends Sunday, September 29, 2013 at 11:59 CST. Winner will be chosen at random and announced on Monday.
a Rafflecopter giveaway

Wednesday, August 7, 2013

As Seen On {Tiny Prints}

This week, I had the pleasure of being featured on the Tiny Prints blog! If you're stopping by from there, I hope you take a peek at the other parties I've styled.  Thanks Tiny Prints for having the perfect invitation for my pink, gold and glittery 30th Birthday Party! If it weren't for finding this invite, I might not have had a party at all!

Tuesday, June 4, 2013

How to Make a DIY Fringe Party Backdrop

A reader asked me how to make the DIY fringe party backdrop seen in my Glam 30th Birthday Party featured on Hostess with the Mostess. I wrote this tutorial up so you can easily recreate the look for upcoming events. This is for you Brittany!

I was inspired by the DIY project over at Shiny Happy Sprinkles, but didn't want to bust out the sewing machine. Here's a DIY fringe backdrop tutorial that is no-sew, requires 4 basic materials, is super simple (you know how to use scissors right?!), and budget friendly (only real cost is tissue paper). The time it takes and amount of tissue paper you'll need depends on the desired backdrop size. I just covered my TV, so I only needed 10 sheets of tissue paper and 30 minutes the night before my party.

Time: 30 minutes - will vary depending on desired size of backdrop
Materials:
- Tissue Paper (10 sheets covered my TV - will vary depending on desired size of backdrop)
- Ribbon/String
- Tape
- Scissors
Cost: $5
Instructions:
ONE - Cut a piece of string a little bit longer than the desired length (horizontal) of your backdrop. For me, this was the length of my TV + a few inches. Open two sheets of tissue paper next to each other to make one long piece (or as many sheets as necessary for your desired backdrop length). Place string down the middle (horizontal), tape it down in just a few spots.
TWO - Fold tissue paper in half over the string.
THREE - Keeping (a) the ribbon in place at the top and (b) the top fold in line with itself, fold your tissue paper in half, and then half again and one more time. This will speed up the cutting process so you cut through multiple layers of tissue paper.
FOUR - An inch from the left, cut vertically from the opening (bottom) of the tissue paper to the top (towards the ribbon), without cutting through the ribbon or fold. You do not need to cut perfectly straight or even lines. Repeat cutting inch wide strips, all the way across the length of your tissue paper.
FIVE - For some texture, crumple up the strips a bit and then smooth them out. Unfold your tissue paper. You just created a row of fringe!
SIX - Pick up each end of the string, with tape handy, and from the bottom of your wall, tape the fringe in place.
SEVEN - Repeat steps 1 through 6 to create each row of fringe until you reach your desired backdrop height. Tape each row right above the last, with some overlap.
{My little party planning assistant}

And that's it! What do you think? Cheap and easy with a big wow factor, right!? My favorite kinda projects! You can check out other parties I've styled here and other cheap and easy DIY projects.

linked up with Home Stories AtoZ and:

Tuesday, May 21, 2013

As Seen On {Hostess with the Mostess}!

Last Mother's Day, a party of mine {Erin's Pink & Green Polka Dot 1st Birthday} made it into a Hostess with the Mostess Party of 5 weekly round up. While I considered that an accomplishment in itself, I can finally cross a huge goal off my personal blogging and party planning bucket list....Getting a full party feature on the amazing Hostess with the Mostess party site! {Yipppeeee!!} 

You can catch my  Glam Favorite Things {30th} Birthday Party on HWTM today!  
If you're stopping by from HWTM, you can check out my other featured parties here or browse all parties I've styled here. Thanks for popping in, I hope you see something you like and stick around to see what else I come up with!

Friday, April 12, 2013

30th Birthday/Favorite Things Party {Pink, Gold & Glitter}

**Thank you for the full party feature, Hostess with the Mostess!**

To celebrate my 30th birthday, I didn't want to go to a bar {those days are long gone} or go to a restaurant where all night, you can only talk to the same four people sitting next to you. Since most of my girlfriends are also turning 30 this year, I thought it'd be fun to celebrate all of us with a Favorite Things Party! Click here to see my inspiration board.
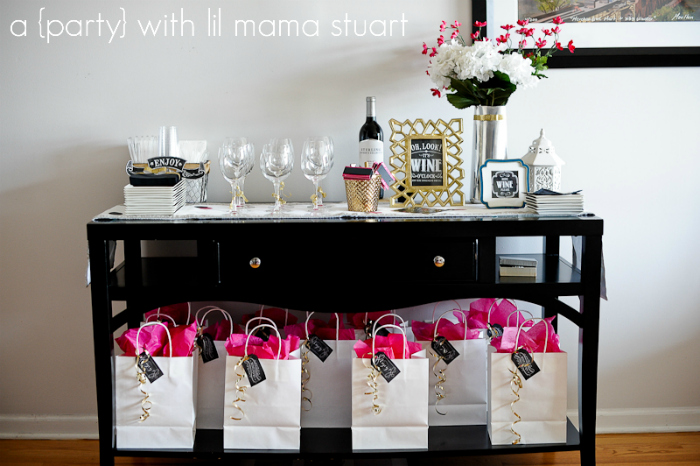
These stemless wine glasses were vases at my previous two parties, but this time they were candle holders. Get the tutorial for the DIY tissue paper fringe backdrop here!

I embellished plain white gift bags so everyone could take their new favorite things home. Since the party was to celebrate all our birthdays, every bag included a simple {~$10} gift that I specifically picked out for each long-time friend.

Speaking of more wine, check out my wine & cheese birthday party here.

DIY tags and food tents/picks so we knew what appetizer, drink or dessert everyone brought.

Is it weird that this little bow tie around the napkins was my favorite detail of the entire party??


How a Favorite Things Party Works: Each person thought of a favorite thing that costs around $10. They brought 3 of that same item. Each person’s wine glass had a number at the bottom and I had numbers 1-12 folded up in a bowl. Daniela, my first guest who arrived at the party, had the honors of drawing a number first. Whoever’s number she drew, she received their favorite thing. Then that person went and drew a number and so forth. Everyone explained their gifts as they were given out. We repeated the drawing from 1-12 three times so everyone went home with three different favorite things!

I also requested everyone bring a favorite appetizer, drink or dessert. The twelve of us gathered 'round my dining table to enjoy a delicious spread of food while catching up since it's not often we all get together anymore.

After our bellies were full, it was time for a quick little game of Guess What Year?! I went through my photo albums from 8th grade on up (when I started organizing my own pictures) and found a picture of me and each guest. I love that I've known each of these girls anywhere from 9 to 27 years ago! Trying to guess the year of each photo and where we were was a perfect way to reminisce and retell stories from our younger, less than finer moments.

Thank you to every single one of my long-time friends who came to celebrate this milestone with me. Love you guys! Cheers to what the next 30 years will bring us! And let's not forget the most memorable words of wisdom for the night...red wine in your Cheerios does not mean lower cholesterol!

Favorite Appetizers, Drinks or Desserts: Art of Pizza, Spinach Dip Crescent Rolls, Bacon Wrapped Dates, Filipino Eggrolls, Giordano's Salad, Great Beijing Spicy Chicken Wings, Rumchata,  Prosecco + Peach Bellinis, Polka Dot RieslingFrench Silk Pie, Chocolate Filled Strawberries and lots of cheeeese!

Favorite Things: Necklaces, HomeGoods Linen Spray + Mason Jar Candles, Nicholas Sparks DVD - 4 movies in 1, Loreal Shampoo and ConditionerStarbucks Giftcards, Vosges Haut Chocolat, Essie nail polishes + Clif Shot Energy Gel + Orbit Gum, Oregon Chai Tea + Biscotti, Bath & Body Works hand soaps and candles.

Sources:
Party Styling & Photography - a {day} with lil mama – me!
Favorite Things Party - inspired by Inchmark and Day Dreaming and Sight Seeing via Kara's Party Ideas
Birthday Party Invitation – TinyPrints
Free Wine Printables – Hostess with the Mostess 
Free Gift Tag Printables - Ellinee 
DIY Fringe Backdrop - inspired by Shiny Happy Sprinkles
Square and Rectangle Appetizer Plates - World Market
Black & Gold Votives, Black Napkins - Party City
Gold Frame and Bowl - Target
Gold Glitter Tape - Shop Sweet Lulu

In the evening, Mia called me to say, "Mommy, I wish I could drive home to have fun at your party." Oh Mia, she sure loves girl talk with mommy and her friends. She also wondered, "Mommy, why are your decorations pink? Your favorite color is red." *sigh* love her!