Photobucket Photobucket Photobucket Photobucket Photobucket Photobucket

Friday, November 9, 2012

Sweet Faces

Unlike past years, I didn't take holiday photos of my nephew and niece this season. But I did get to spend some quality time with them while we visited our cousins in Michigan before Halloween. See how these two have changed from 2010 and 2011.

Ryu is 7, a skinny little young man who adores his baby cousin Mia.

Kira is 4, with sweet intentions, wants to make friends with any kid she sees. Just like last year, Kira is best captured by surprise!

Thank goodness the weather should be in my favor this weekend with a comfortable 65 degrees. I have five families to photograph for the holidays! Did you pick out your holiday card already? Mia and I worked on some cards that are going in the mail this weekend!
 

Thursday, November 8, 2012

Travel Themed Wedding - DIY Details

While my newlywed friend is honeymooning on the beaches of Thailand and Bali, I wanted to share her travel themed wedding with you all. There were too many DIY details for me to keep to myself! {I attended as a guest admiring their details and not as their hired wedding photographer.} Jing and John got married less than a year after they got engaged.

Programs and menus were printed on their own and adorned with the couple's personalized stamp.
The personalized stamp was also used on their save the date, invitation, and other paper goods throughout.

On top of training for her first marathon, the couple had a lot of {hard} work to do and decisions to make to pull together every detail of their “non-hotel” wedding. Even if it meant squeezing in 2 hour runs home from work, Jing was determined to make her wedding vision happen. With the help of event management team Oliveaire, Jing & John selected the former warehouse turned Skyline Loft at the Bridgeport Art Center for the brick walls, lengthy windows, skyline view and urban feel.

Jing doesn’t consider herself a creative/artsy/right-brainer, but from her very pulled together wedding, every guest would disagree. Upon mysteriously entering the freight elevator to go up to the cocktail hour and reception, guests were greeted with the couple’s initials. The DIY twine wrapped letters were actually made by a bridesmaid for another friend’s wedding. Thanks Tina and Jackie!

To go along with the travel theme, Food Evolution Catering personalized a worldly cocktail hour menu complete with margaritas served in mini Patron bottles (Mexico), sangria in mason jars (Spain), sushi (Japan), and more.

Luggage tags debossed with a travel quote on the back doubled as giveaways and place cards. There's that personalized stamp again! In typical {late} Jing fashion, the order was placed less than two weeks before the wedding and she didn't even have to pay rush shipping!

An open suitcase welcomed guests’ cards instead of a standard box.  Postcards collected from their travels (and friends and family) were used in lieu of a traditional guest book. Guests picked a postcard, wrote a message and placed it in the mailbox. 

Hanging tea lights and DIY lace/twine wrapped mason jar candles created a warm atmosphere throughout the loft.
Thanks to Ebay, Jing scored massive amounts of luggage for half the price of vintage stores. Can you see the paper airplanes hanging as a backdrop behind the head table? Over a few weeks/months, Jing’s brother-in-law’s brother folded 400+ airplanes! Thank you, Ray! However, stringing the airplanes on 20-foot strings and transporting them was a whoooooole ‘nother issue. But so worth it!

Adam Havrilla was the {awesome} head designer who came up with the unique centerpiece idea of ivory lilies and gardenias and blush and faint yellow garden roses inside suitcases. To cut costs and avoid purchasing 30 suitcases, other tables were adorned with traditional vases to enhance the pretty, antique, vintage look of the venue.
Bridesmaids painted $1 thrift store frames (what a deal!!) and filled them with maps and numbers cut using a Cricut.


Jing found her Allure Couture dress from Weddings 826. Since the dress was a little to plain for Jing’s liking, it was customized with a sweetheart neckline and flower embellishments. Here's the couple enjoying a song performed by their family.

The DIY details for Jing and John’s travel themed wedding décor was a true family and friends affair. Everyone from bridesmaids, brother in laws, aunts, and sisters chipped in with their time and effort. For more travel themed wedding ideas and resources, check out Jing’s Pinterest boards here.

Vendors:
Venue – Skyline Loft at the Bridgeport Art Center
Caterer - Food Evolution
Florist - Artistic Blooms Chicago
Wedding Planner - Oliveaire
Suitcases & Luggage – ebay
Luggage Tag Place Cards – Motivators
Dress – Allure Couture via Weddings 826

Annnnd with White Castle sliders passed by servers on silver platters, we called it a night!
Good job Jing - you guys pulled it off beautifully!

Friday, November 2, 2012

Fall Weddings

If you haven't stopped by recently, I invite you to check out the latest weddings photographed by the Misha Media Benchmob! Seeing images from our recent fall weddings has me pumped for tomorrow's wedding at the Westin Chicago Northwest. If you need a wedding, engagement, portrait or event photographer in the Chicagoland area, please keep me and my team in mind! We'd love to meet you!
 
Have a great weekend!

Thursday, November 1, 2012

Introducing {Baby Blake}

My husband had a baby!! Well, my {business fraternity} pledge husband that is. Brian and Jamie welcomed Blake Robert promptly on his due date, albeit at 4am!


What a cute name, right?! More importantly, Blake is Brian's mother's maiden name, while Robert is Jamie's dad's and grandfather's name. Geez, could that be any more perfect?

Brian and Jamie did a wonderful job on their baby boy's nautical themed nursery. The artwork, pillows, bedding, mobile and accessories coordinated perfectly with the blues, red, whales and sailboats throughout. Loved it all!

I even caught the family dog, Coby, enjoying his little brother's room.

Despite the need for nursing, diaper changes, rocking, and swaddling to get Baby Blake comfortably asleep, Brian and Jamie kept cool and were naturals at soothing their little man.

Jamie, thank you for letting me spend your special birthday with you and your boys.
I wish nothing but the best in this new chapter of your life!

Click here to see more {babies} get SO big and other family portraits.
 

Friday, October 26, 2012

Tired.

With a wedding (as a guest)...

...newborn session...

...pumpkin carving party...

...DIY Halloween decorations, a husband out of town all week and a long drive to Michigan ahead of us...lil mama's tired! Details to come on the travel themed wedding, precious Baby Blake and Halloween...But first, a fun weekend for the mini-me cousins!
Have a good one!

Monday, October 22, 2012

DIY Wings - Ladybug Halloween Costume

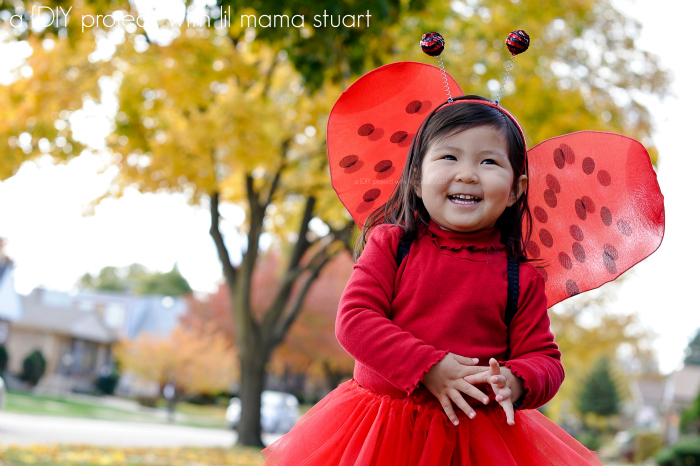
How many of you are still scrambling for a Halloween costume? For once, I didn't wait until the last minute to whip up Mia's DIY costume! How cute is this little ladybug girl?

Her first Halloween, I made her into a bunny.

The year after that, we turned her into a puppy, just like her favorite stuffed animal, Daisy.

This year, despite her first choice of wanting to be a princess (shocking), I suggested my 2.5 year old to be Ladybug Girl!

Yes, you could easily purchase a ladybug costume. But the thought of cheap polyester gives me the heebie jeebies. So today let me show you how to make your own ladybug, fairy, butterfly, bee or angel wings for less than $5.

Time - 30 minutes

Cost/Materials
$0 - 2 wire hangers (from our dry cleaning - use ones that are easily bendable)
$4 - thin nylons/tights (found mine at Joann's for 60% off - don't use thick tights or it won't stretch as easily)
$1 - 2 pieces of stiff felt
$0 - elastic (had some in my stash)
- needle/thread
- hot glue gun
- fabric glue (not necessary, but I trust it more than hot glue)

Instructions
1-2. Take your wire hangers and stretch them out to your desired wing shape. Bend out any kinks for a smoother shape.

3. Slip each leg of your tights over a hanger. Reshape hangers as necessary to get desired shape and smooth out tights.

4. Place wings into desired position and wrap excess portion of tights where the two hangers meet. I also bent the hook of the hangers inwards so they wouldn't snag on the wings.

5. Measure two pieces of elastic on whoever will be wearing the wings to ensure a proper fit around arms/shoulders.  
Cut two hearts from stiff felt, large enough to cover where the wings meet.  
Pin your elastic in place onto one piece of felt.  
Pin both pieces of felt together, sandwiching your wings.  
Try the wings on your subject to make sure the sizing is correct.
Hand sew each end of the elastic to one piece of felt. Make sure you reinforce those stitches to handle wear and tear.
With your wings in between, hot glue the two pieces of felt together.  
Smush it all together for a bit to adhere as much as possible.  
Repin the felt together, so the two pieces stays together while you hand sew it shut. Since I didn't want to risk sewing through the tights and creating a hole/run, hand sew all around the felt, but NOT through the wings/tights. If you need reinforcement for the felt to stick to the tights, apply fabric glue where necessary.

And that's it - let your little one flutter about for some Halloween candy!

To complete the DIY LadyBug girl costume, Mia's wearing black leggings, a red DIY satin trimmed tutu (or try a no sew tutu tutorial here), a red turtleneck and an antennae headband (60% off at Joann's). Not bad for an entire DIY costume under $10! For days, Mia asked if I was done making her costume and wanted to help sew *sigh* Love that feeling!

What are you or your little ones dressing up as this year?

linked up with Make It and Love It and: