Photobucket Photobucket Photobucket Photobucket Photobucket Photobucket

Tuesday, May 8, 2012

{Sophie} - 7 months

I met Baby Sophie at Erin’s 1st birthday party in March. Recently, Sophie welcomed me into her home to photograph her as she turned seven months old. 

When going through her images, I seriously sat there smiling at the computer picture after picture! How can daddy’s sweet pea not bring a smile to your face!?

And who doesn't love chubby baby legs and sweet soft toes...You have to enjoy them while you can - babies thin out faster than you think!

Mommy and Daddy love reading to their baby girl in their rocker...

Sophie was a tad fussy because she's teething, but the ever so popular Sophie the Giraffe made her feel better J

My nephew and daughter both made this exact same squishy face. Love it!!

The family’s home had beautiful lighting throughout and I’d photograph baby girl all day if she didn’t need a nap!

Even though Sophie was awake way longer than normal, Daddy said he’d never seen his baby girl so happy before.

*sigh* And that’s why I love what I do! I hope to see you for another portrait session sweet pea!
hehe - love big gummy smiles!


linked up here:
Sweet Shot Day Live, Love, Travel

Monday, May 7, 2012

Wedding Season Begins – As a Photographer!

This Saturday, I assisted Misha Media with our first wedding of the year. Last year when I announced the beginning of wedding season, it was as a guest. But this year, it’s as a photographer!

Friday was another photography first for me and I cannot wait to show you what a unique event it was!! But until then, would you be a dear and send anyone who needs a wedding photographer in the Chicagoland area {but also available for destinations} to Misha Media Bench Mob? My team and I would love you so ♥  

Have a wonderful week!

Thursday, May 3, 2012

Kentucky Derby - What to Wear??

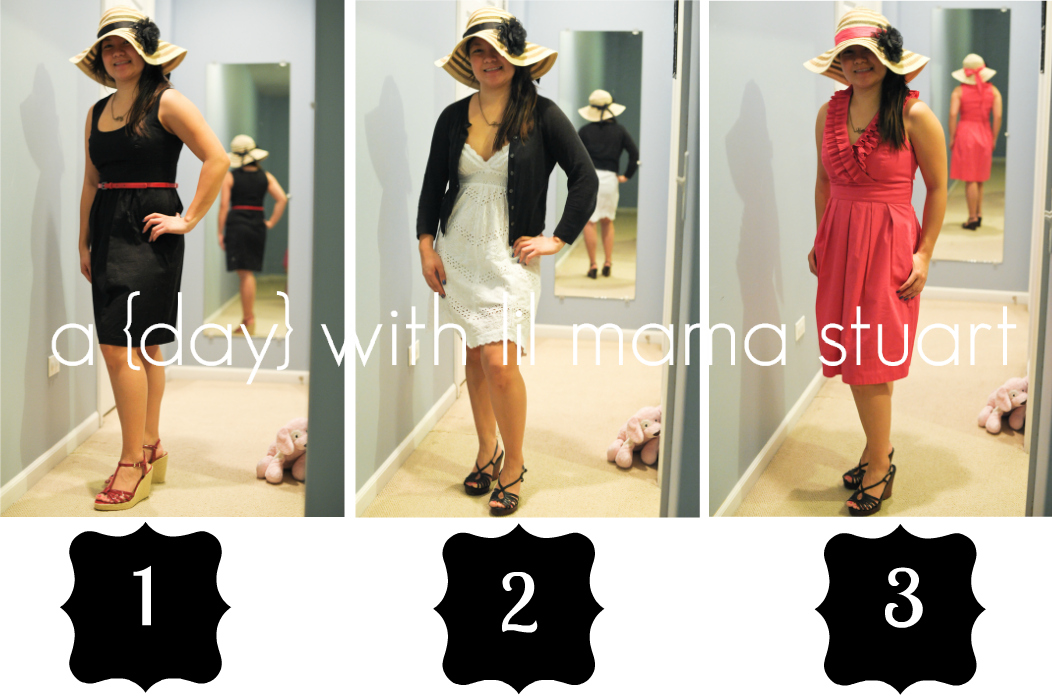
My friend is going to Arlington Park this weekend for the Kentucky Derby. And just like always, she came to me for ideas on how to whip up a random outfit. Not that I've been to the Derby or anything. But crafty lil mama can always figure something out! And I love playing dress up with Marian!

Now we {including Daisy sitting there like a good dog should} need your help! We worked with what we had, but which outfit should my friend wear in true Kentucy Derby Fashion? Please vote by leaving a comment, 1, 2 or 3! Now that I see these side by side, I vote #1! Probably because I love red. And the silhouette of the dress and belt is so flattering! Ok and I love the shoes, which I have yet to wear! What do you think?

**We should've photographed her with white wedges in #3, boo!**

 And this mini me had a lesson on how to pose people for photographs, despite being past her bedtime!
Have a great weekend!
Hopefully Marian will win some money like I did, betting on horses' names.
Bow Tie Pasta won me $50 my first time at the track!

Wednesday, May 2, 2012

Baby Girl's Nursery/Toddler Bedroom Decor

Thrifty Décor Chick hosts monthly linky parties to Show Us Your House.  May’s theme is nursery/kid’s rooms and now that Mia’s two, I should probably do a post about her bedroom! Would you like a tour of my favorite room in our condo? I’ll give you the details on all the simple DIY projects to personalize my daughter’s room.

This circle rug set the direction for the décor in my baby girl’s room. I didn’t want her room to be too pink or overly girly. If you need a quality, cheap rug store in Chicago let me know! Since I couldn’t decide between rugs, the owner let me pay for one rug, but take home two to try out and bring one back the next day! The lamp is from IKEA and bedding was on clearance from Target. The pieces of paper with her name are decorations from her 2nd birthday party.

The name print is from etsy shop Baby Byrds. Given that every baby in my extended family has their own personalized print, you know I love Christen's custom designs.

I easily DIY’ed the window valence. It was all straight stitches (my kinda project!) and I love the pom pom trim. I lined the flower print fabric with white fabric so you can't see through it when the sun shines.

Having the twin bed in there has been a great! If we have guests, they have a bed to sleep on. When I nursed at night, I just rolled over, took a few steps and could scoop her up for a feeding. When she can’t sleep alone at night, I sleep in here. We never needed a changing table, we just used the bed. And we have a place other than the floor to cuddle. JJJ

 I DIY’ed the floor and baby tag pillows {tutorial here} with a simple envelope closure.

The DIY painted corkboard is mine from college. The DIY painted wooden letters are from her winter one-derland birthday party. For Christmas gifts, I make calendars through Snapfish.com

The white bookshelf is from Target, which I lined the backs with scrapbook paper. And by "lined", I mean taped with double-sided tape.  The white basket on top holds wipes, lotions, and diaper cream. Another basket holds diapers and a changing pad. And another basket holds socks, tights and legwarmers. Two more baskets on each side of the shelves hold toys. {all baskets from Michael's}

 
I DIY’ed hooks by cutting a hole in styrofoam discs covered with fabric. 3M hooks are great if you don’t like putting holes in walls! Her cute little backpack is from etsy shop Marine Parents, which I came across at the Queen Bee Market when I went to BlogHer last year.

The vinyl flowers were on sale from etsy shop Byrdie Graphics.

Her “laundry basket” is a fabric bin from Target 2 ½ years ago. More circles and in the right colors! I love when you stumble across the perfect finds! The size is deceiving, it fits a full load of laundry. I DIY’ed a fabric laundry basket liner so it wouldn’t get gross and could be washed.

The DIY no-sew crib skirt was from fabric from her 1st birthday party {tutorial here}.

I cheaply DIY’ed the circle wall art above her crib with 3 materials. (1) Styrofoam discs (2) fabric (3) straight pins or hot glue. All I did was wrap the foam discs with fabric and secure with pins or hot glue.

My sassy little lady loves to look at herself after I do her hair or change her outfit.

I used 3M velcro type strips to hang circle mirrors {from Michael's & Joann's}. The hook initials were from the Michael's $1 bins and hold headbands, necklaces, bracelets and tiaras. The basket below holds skirts for dress up.

Instead of a bow board, a long ribbon draped from the desk holds all her hair clips.

My sister-in-law bought Mia the “Dance” sign {from Target I believe} for her first birthday. Instead of the plain statement of DANCE, I decided on “Let’s have a dance party” instead. We used to say that to Mia all the time when she was just starting to stand and bounce around J This was another cheap DIY project. I printed the letters out using Microsoft word, cut them out and used double sided tape (!) to attach them to the wall! Who needs a Silhouette machine or vinyl!? Ok, I would love a Silhouette. If only I could win one from a giveaway already!

On the wall is a DIY growth chart {tutorial here} that I made for free and you guessed it, super simple!

These picture frames have made it from our wedding, to my baby shower, to Mia’s second birthday party and now to her bedroom J Look at those itty bitty newborn hands and toes! The hand prints were her first art project, with Daddy!

And that’s it - two years later and I finally posted about my "baby's" room!


linked up here:
Thrifty Decor Chick

Tuesday, May 1, 2012

How to Make a Blog Button Tutorial

Have you seen my {recipes}, {DIY projects}, {parties} and {photo shoot} pages lately? Instead of text links, I made my pages easier to navigate with visuals of each post, which you can click on to go directly to that post. What do you think? I especially love how you can see my {Getting SO Big} babies change throughout the year.

Yesterday I showed you how to watermark an image without using Photoshop. Today I have a tutorial on how to make your own blog buttons/picture tiles with active links.  

Note 1: My blogging platform is Blogger, which uses Picasa for hosting pictures.
Note 2: I have no experience with html but have taught myself some basics through 2 years of blogging. 

  1. Go to fotoflexer.com and upload your image.
  2. Crop image to desired dimensions. Buttons are typically a square. Unlike picnik.com, there's no option to crop to a square so I eyeballed it. Then I clicked on resize, UNchecked the "keep proportions" box, and made the dimensions equal (to be a square). My initial guess was close, so distortion is minimal.

  1. Add text if you want.
  2. Save it to picasa (or your photo hosting site, instead of your desktop). I made a separate picasa album specifically for thumbnails for ease of access.
  1. Open up your post/page where you want the button to go and use the following code in “edit html” (not “compose”).
<a href="http://YOUR LINK HERE.html"><img src="https://IMAGE LINK HERE.jpg" width="183" /></a>
Note 1: There are three highlighted areas:
                                                              i.      The link you want to send the reader to, ending in .html.
                                                            ii.      The picture that you want to be shown with the link, ending with .jpg.
                                                          iii.      The width of the button/image. See note below.
Note 2: Buttons are typically 150 x 150 (to easily put on sidebars). I have my width set to 183 so that I can stack 3 images on one line because the width of my body is roughly 550 (=183x3).
You should know what the width of your blog body is or just play around with different numbers until you get the size you want.
Note 3: My friend Christine’s post taught me the difference between “curly” and “straight” quotations. Check this post if your button doesn’t work. Christine also tells you how to write your code for others to grab and use your blog button. 
  1. Go to picasa and select your square picture from the album you saved it in.

  1. Click the picture to view it full size. 
  2. Right click and select “properties”.

  1. Copy the “URL/address”, which should end in .html. Double click on the address to select and copy the entire URL because the URL is longer than what is shown (which is why you can't see the ".html" below).

  1. Paste the address of the picture into your code where highlighted. 
  2. Paste the address of the link you want your reader to go to into your code where highlighted.
<a href="http://YOUR LINK HERE.html"><img src="https://IMAGE LINK HERE.jpg" width="183" /></a>

Test it out! Click on your picture. Does it go where you wanted it to? If not, double check your code to see if you missed something. Ta-da! You just edited some html and made a blog button (picture that when clicked, directs your reader to a link).


linked up here:
Home Stories A2Z Live, Love, Travel