Her first Halloween, I made her into a bunny.
The year after that, we turned her into a puppy, just like her favorite stuffed animal, Daisy.
This year, despite her first choice of wanting to be a princess (shocking), I suggested my 2.5 year old to be Ladybug Girl!
Yes, you could easily purchase a ladybug costume. But the thought of cheap polyester gives me the heebie jeebies. So today let me show you how to make your own ladybug, fairy, butterfly, bee or angel wings for less than $5.
Time - 30 minutes
Cost/Materials
$0 - 2 wire hangers (from our dry cleaning - use ones that are easily bendable)
$4 - thin nylons/tights (found mine at Joann's for 60% off - don't use thick tights or it won't stretch as easily)
$1 - 2 pieces of stiff felt
$0 - elastic (had some in my stash)
- needle/thread
- hot glue gun
- fabric glue (not necessary, but I trust it more than hot glue)
Instructions
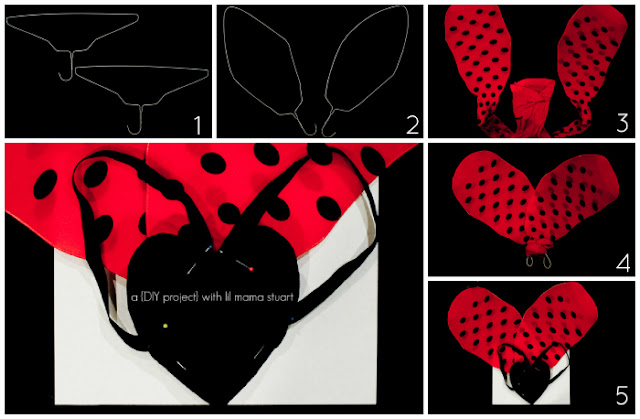
1-2. Take your wire hangers and stretch them out to your desired wing shape. Bend out any kinks for a smoother shape.
3. Slip each leg of your tights over a hanger. Reshape hangers as necessary to get desired shape and smooth out tights.
4. Place wings into desired position and wrap excess portion of tights where the two hangers meet. I also bent the hook of the hangers inwards so they wouldn't snag on the wings.
5. Measure two pieces of elastic on whoever will be wearing the wings to ensure a proper fit around arms/shoulders.
Cut two hearts from stiff felt, large enough to cover where the wings meet.
Pin your elastic in place onto one piece of felt.
Pin both pieces of felt together, sandwiching your wings.
Try the wings on your subject to make sure the sizing is correct.
Hand sew each end of the elastic to one piece of felt. Make sure you reinforce those stitches to handle wear and tear.
With your wings in between, hot glue the two pieces of felt together.
Smush it all together for a bit to adhere as much as possible.
Repin the felt together, so the two pieces stays together while you hand sew it shut. Since I didn't want to risk sewing through the tights and creating a hole/run, hand sew all around the felt, but NOT through the wings/tights. If you need reinforcement for the felt to stick to the tights, apply fabric glue where necessary.
And that's it - let your little one flutter about for some Halloween candy!
To complete the DIY LadyBug girl costume, Mia's wearing black leggings, a red DIY satin trimmed tutu (or try a no sew tutu tutorial here), a red turtleneck and an antennae headband (60% off at Joann's). Not bad for an entire DIY costume under $10! For days, Mia asked if I was done making her costume and wanted to help sew *sigh* Love that feeling!
What are you or your little ones dressing up as this year?
linked up with Make It and Love It and:


4 comments:
Absolutely darling!
I loooooooovvvve it!!! Good job! :D
Love love love! All of a sudden she's all grown up!
love this! SO creative!
Starting following awhile ago but had yet to comment. Love your blog!
www.meetmaxwell.blogspot.com
Post a Comment