Photobucket Photobucket Photobucket Photobucket Photobucket Photobucket

Thursday, August 23, 2012

Travel Themed Wedding Invitations

Last weekend was my old college roommate's wedding shower. When I received her wedding invitation in the mail, I couldn't stop rubbing my fingertips over the thick cardstock and luxurious letterpress! So...naturally for my DIY wedding loving self, I just had to show you all the lovely details!

The bride found Wicker Park's Steracle Press from yelp, of all places for wedding planning! She worked with Stacey Stern at Steracle Press to combine these two ideas to jumpstart her vision of a travel themed wedding.
 
Mmmk not only was the invitation letterpressed, but so was the entire set! I was impressed by both the letterpressed directions and reception cards which were both backed on cardstock and old maps. The bride used maps from old atlases and National Geographic magazines purchased from ebay. The envelopes and pockets were purchased from cardsandpockets.com
 
In addition to all the letterpress, I loved the personalized stamps with the bride and groom's wedding date, names and city. The bride purchased the personalized stamp from A&E Rubber Stamp, located in Chicago's loop. Pretty good investment considering it was only $10, with next day service and the stamp will be used throughout the wedding.  It's all in the details people!
 
Save the dates set the tone for your wedding theme. Inspired by these, the soon to be newlyweds showed their love for travel with postcard save the dates (top left) from Vista Print. The couple received a discount for also ordering the RSVP postcards (bottom right) that came with the wedding invitation.

The (printable and editable) wedding shower invite from Paper and Pigtails (bottom right) also perfectly coordinated with the rest of the wedding's travel themed paper goods.

And since I love themed/coordinating gifts, I purchased tupperware off their registry and included money to purchase this Map of the World from Old Postcards print from etsy shop ArtPause.
Source: etsy.com via Mindy on Pinterest

 
I prettily wrapped up the shower gift in grocery bags (free!), green burlap, green raffia and a stamped envelope.

I can't wait to see all the details at the wedding in October! Hopefully the bride can fit in all the DIY with marathon training. Crazy girl!
{Beautiful and delicious bridal shower cake from Bittersweet.}


linked up here:
Live, Love, Travel

Sunday, August 19, 2012

Beachy Pinwheel 1st Birthday Party: Decorations

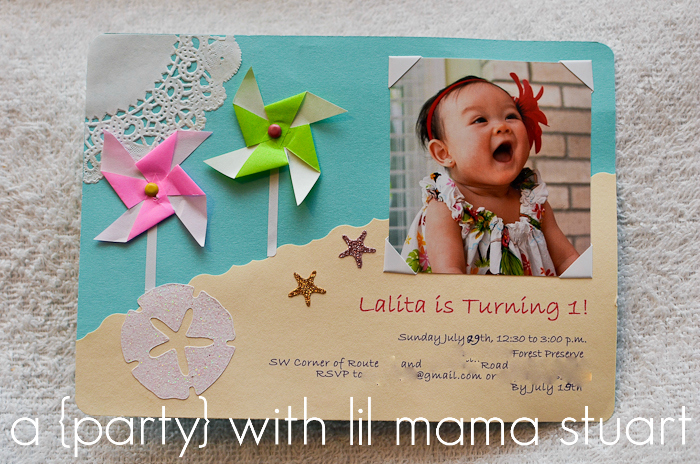
Recently, I created a party plan for a mom who said she's never been very crafty and her creative skills are lacking. Ummm, momma was wrong! Just look at this DIY invitation!
If she hadn't mentioned her lack of craftiness, I would've thought she was a scrapbooker! I love all the layers!

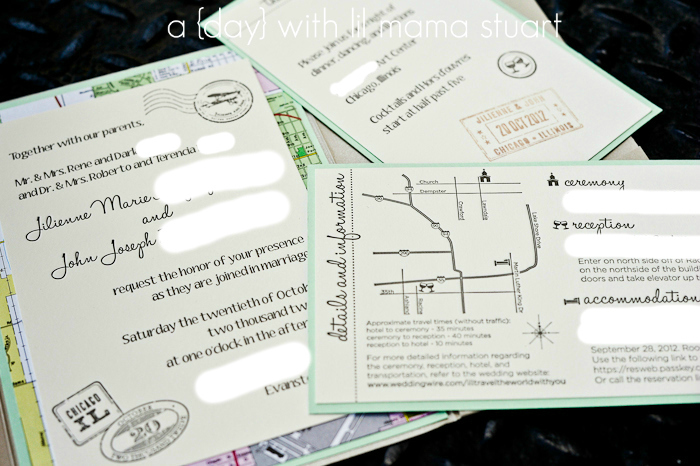
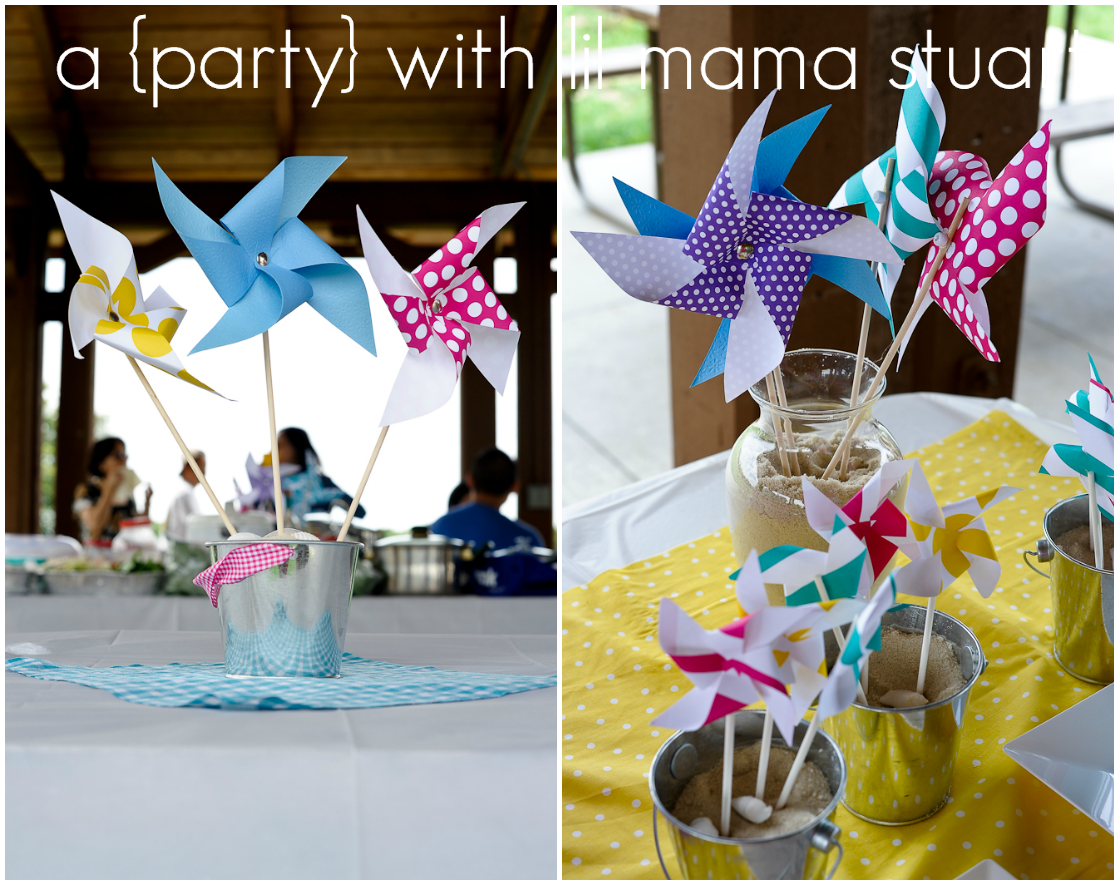
Invites set the tone for an event, and this party was no different. Momma P put together such a colorful beachy pinwheel party for this pretty little girl's first birthday!
Aren't her gold accessories gorgeous? Grandparents sure know how to spoil the little ones! Baby girl's ruffle romper was from etsy shop Pretty Petals Hair which coordinates perfectly with the rest of her party...

Since the party was outdoors at a forest preserve picnic site, Momma P opted for white melamine dishes from Party City. They easily passed off for real plates, but were cheaper, safer and lighter to transport..and still reusable.


Momma P and her friends and family spent long hours DIYing all the decor. But, they were one of the most fun hours they had ever spent with each other; reminiscing of fun times, laughing when they goofed up, and just being excited for the party.
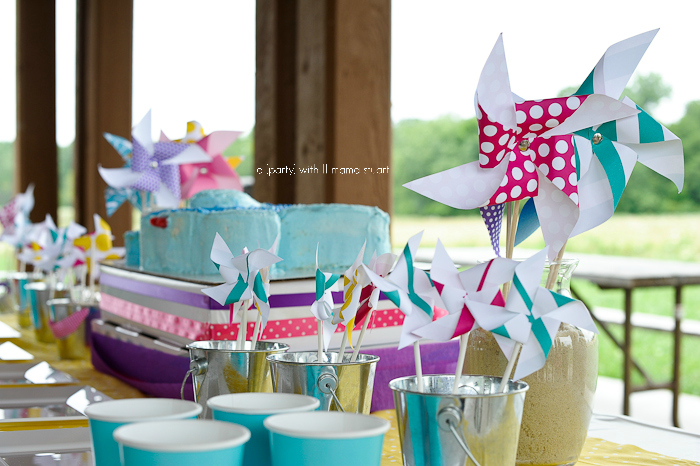
Sand from Home Depot is cheaper than the play sand at Babies R Us. Pails are from the always trusty Target $1 spot.

I love how Momma P incorporated coordinating fabrics to transform a forest preserve picnic shelter into a beachy paradise! A square of fabric under the centerpieces (taped down so it wouldn't flip up in the wind) made for a perfect finishing touch.

She also used fabrics over plastic tablecloths at the food, gift and giveaway tables. Using twine also added to the beachy vibe.

I always tell mom's to designate a place for guests to put presents. It's the first thing people look for after saying hello.
  
 I love how Momma P carried the lace from the invite into this monthly pictures banner, complete with seashell clothespins hanging from twine. Dad did such a wonderful job taking the monthly pictures!

A fun table cloth including markers and trinkets kept the older kids busy.

How cute is this cake shaped like a fish? Momma P's friend made it, and one of the bubbles served as baby girl's smash cake! Her fun birthday hat headband was a Party City find. For other party supplies, Party City was quite pricy unless you had a coupon. Wal-Mart carried items in similar colors for much cheaper.

And for giveaways, guests were able to keep the fish they "caught." How clever!! Momma P also shopped her house to embellish this table.

Great job mom and dad! The month of planning, 2.5 hours set up before the party and half hour to clean up after wasn't so bad, was it?

I think baby girl loved her party. She says thanks momma! J
It's all worth it for these smiles, right??

 linked up here:

Wednesday, August 15, 2012

Easy Buffalo Wing Recipe

With football season inching closer, why not get started on some tailgate food? How about tasty buffalo wings? 

My momma taught me how to make these and I tweaked it a bit. Here's what you'll need:
Serves: 2-3 people (approximately 24 pieces)
Time: 1 hour
Ingredients:
2 packages of chicken drumettes (or wings)
Salt, pepper and cayenne
Flour
Oil for frying
Frank's Red Hot Sauce
Optional: Paprika and garlic powder

Instructions:
1. Rinse and pat chicken dry. Season both sides with salt, pepper and cayenne.
2. Mix ¼ tsp paprika, ¼ tsp garlic powder and ½  tsp cayenne into 1 cup of flour.
3. On medium high heat, heat oil (enough to cover the bottom of your pan plus the depth of half a chicken wing, about ½  inch to 1 inch).
4. Dredge (cover) each chicken wing in flour mixture and tap to shake off excess.
5. Once oil is hot, place a batch of wings into oil and fry for 6 minutes. I worked with batches of 6 wings at a time in a standard size frying pan.
6. Flip wings and fry for another 6 minutes. If they are still bloody or not quite brown, give it another minute or two and flip again if necessary.
7. Remove wings from oil, letting excess oil drip off and place into an empty small pot/bowl. Shake enough dashes of hot sauce to partially cover wings and toss. I am terrible with tossing and have not mastered the wrist flick. One wing always jumps out of the pot!
8. Pile on a plate, repeat steps 5-7 and dig in for some finger licking good wings! If they aren't spicy enough, add more hot sauce in step 7.
 
9. Keep toddler occupied by ignoring the huge mess she is making. As long as she's quiet, happy and out of the oil splattering kitchen, I'm ok with it!
10. Serve with rice if you're asian. Or ranch and celery works too J
How do you make your buffalo wings?

Friday, August 3, 2012

DIY Alphabet Flash Cards

Last weekend my friend noticed Mia's ABC flashcards and questioned if I made them. Of course she knew the answer was yes! But she didn't really know why I would DIY my own alphabet flashcards when I could easily buy them. Considering time, effort, money, supplies and difficulty, I pick my battles when deciding what projects to DIY versus buy. Since this was an easy, cheap project that Mia could help with, I chose to DIY. What can I say, it just makes my heart happy!
Cost: few bucks for cardstock
Supplies: printables, cardstock, glue stick
Time: 15 minutes

Thanks to Homemade by Jill, all I had to do was download her FREE printables then print, cut and glue each one to cardstock. Mia liked helping with this project and really does enjoy doing her flashcards. And yes, my "freak of nature genius baby" (what my friends call my 2.5 year old) knows all the pictures and nearly all the letters. J

Thursday, August 2, 2012

Balsamic Vinaigrette Chicken Pasta Salad Recipe

Just like last year, Doug's firm provided free lawn tickets to see the Chicago Symphony Orchestra at the ever popular Ravinia Festival in Highland Park. We left the city at 615pm, got to the 'burbs by 645pm, but had to wait in a slow moving line for $10 parking. After parking and cleaning up Mia's potty accident, we were settled onto our blankie by 7pm...as were hundreds of other people.

Same time last year comparison!

In the hour before showtime, we snacked on plenty of cheese and crackers, grapes and nuts, salami and prosciutto and pasta salad with balsamic vinaigrette, grilled chicken, grape tomatoes, basil and mozzarella.

I made this pasta salad for a recent family party as well and my sister in law asked for the recipe. So here it is!
Ingredients:
- Grilled Chicken Breasts, sliced (I just discovered thin cut chicken breasts, huge time saver with just 3 minutes per side!)
- Pasta (penne, rotini or bow tie), cooked according to package directions
- Grape Tomatoes, halved
- Basil, chopped
- Mozzarella, cut into bite size pieces
For the vinaigrette (double if making a whole box of pasta):
- 1/4 cup balsamic vinegar
- 2 teaspoons dark brown sugar, optional
- 1 tablespoon chopped garlic
- 1/2 teaspoon salt
- 1/2 teaspoon freshly ground black pepper
- 3/4 cup olive oil (I usually only use 1/2 this amount.)

Instructions:
Prepare the vinaigrette, according to Emeril's recipe. Combine all ingredients. Toss until coated. Enjoy!

The vinaigrette also tastes great on mixed greens for a light salad.

While the concert started at 8pm, intermission was around 845pm, right at Mia's bedtime. Having finished our bottle of wine and it almost being dark, it was the perfect time to head home after a wonderful (and cheap!) summer evening out. There's not much more I love than cheese, crackers, wine and laying on a blankie with my shoes off. Summer is quickly slipping away!

Wednesday, August 1, 2012

Good Night Chicago - Shedd Aquarium

This weekend, we crossed another page off Mia's "Good Night Chicago" photo book that I'm re-creating for her.
Good afternoon, sharks, fish, turtles and mammals at the aquarium.

Even though everyone says it's crowded at the Shedd Aquarium, especially on a weekend, we still went on a Saturday afternoon. And wow. It. was. packed! You see the people under the blue awning below? Yeah? Well the line actually extended three times past that point! I couldn't believe it! I definitely recommend paying the $5 in fees and purchasing tickets in advance to avoid a ridiculously long line. Also check the schedule to see if the aquarium is closing early that day for a special event.

Thankfully, there is an accessible entrance off to the side for wheelchairs and strollers. So even though we didn't purchase tickets in advance, we waited maybe 5 minutes thanks to this accessible entrance/separate line. Phew!

A trip to the Shedd to see all the exhibits is not cheap. The parking garage under Soldier Field set us back $22. Doug and I each purchased $35 tickets and since Mia is under 3 years old, she was FREE. But our Total Experience Passes did include:
So cool! And weird if you think about these unique creatures.

A 15 minute 4D show:
We didn't feel the need to dumb it down for Mia, so we chose Planet Earth instead of Dora chasing a robot butterfly (what?!) or Ice Age.

A 30 minute aquatic show with dolphins, a sea lion and beluga whales:
I don't think it's as exciting as a show at Sea World or actually swimming with dolphins, but it was ok.

Wild Reef, my favorite exhibit!
 This is where the sharks are at! And the floor to ceiling tank and enormous creatures are amazing. Makes me feel like a kid in awe. every. time.

The Oceanarium, where you can see the penguins, beluga whales and dolphins in the underwater viewing area.:
I love seeing all the strange creatures that also kinda creep me out.

We shelled out another $20 for a sandwich, yogurt and hot dog. But when you eat on the terrace with the most amazing view of the skyline and lake, you forget how much you paid for a crappy lunch.

After being at the aquarium for 3 hours, Mia fell asleep in Doug's arms while we navigated through bustling crowds of people to see what creatures resided beyond the glass. So we called it a day and sat on a shady park bench to take in the view while Mia napped.

*sigh* I love museum campus.

Need to catch up on my re-creation of the Good Night Chicago book?
Good morning, Lake Michigan. (There's a lot: May 2010, May 2011, July 2011, and many more not blogged about!)
Good morning, Chicago Harbor Lighthouse. Are we ready for a wonderful day? (Not sure this will ever happen.)
Good afternoon, sharks, fish, turtles and mammals at the aquarium.
Wow! Look at those dinosaur bones at the Field Museum of Natural History.
Choo! Choo! There go the model trains at the Museum of Science and Industry.
It's nice to see you, art.
Hello, historic Water Tower on the Magnificent Mile.
Good luck, Chicago Sports Teams, you can do it. (If the Cubs didn't suck, maybe we'd have more motivation to go sooner.)
Just listen to those blues and jazz musicians. (This'll be something new for Doug and I, too!)
Good evening, star gazers at the planetarium. Have you ever wished upon a star?
Goodnight Chicago, sleep tight. Thank you for a wonderful day!