Friday, September 30, 2011

1 Year + 3 Winners!

Happy Friday everyone! As if you didn't know by now, today marks my one year blogiversary! It's gone by fast, and surprisingly, I haven't run out of things to talk about yet. And even more surprisngly, people are listening! So thank you for taking the time to spend a {day} with lil mama J
Hopefully I don't get burned out, but I think things are just getting started. As Pioneer Woman said the other day, "I’m nowhere near where I want to be. But I’m a lot closer than I’d be if I hadn’t kept going." Although I don't know where I'll be and what I'll be doing years from now, I know something good (aka creative) is in store for me...

On to our three winners shall we!?
Winner of the Little Penelope Lane hair wrap is....Samantha!
Winner of the Ruffled Begonia apron pattern is...Ashley @ Cherished Bliss!
Winner of the Baby Byrds 8x10 personalized print is...Nelly @ I Can Dabble!

Emails have been sent to the winners. Thank you all for entering! If you haven't entered the Paper Culture giveaway yet, I'm leaving it open through Sunday October 2nd, 11:59pm, winner to be announced Monday! Have a great weekend! Tonight I have a LONG list of supplies to gather from Michael's and Joann. By myself. In peace. Exciting Friday night isn't it? Don't be jealous.

Thursday, September 29, 2011

**CLOSED** Giveaway #4 - Paper Culture

If you’re new around here, have you checked out giveaways 1, 2 and 3 for my blogiversary? Take a peek, you can still enter!

So you’ve heard about Paper Culture here, here and here. But let me give you a refresher on why this modern eco stationery company impressed me time after time. Do check out their holiday cards/invitations,
modern baby announcements, baby shower invitations, birthday party/other invitations, thank you cards and stationary.
  1. Customize. It was a breeze to customize the colors (background, font, images) of my invitation to go from their Holiday Party red to my Winter One-derland lilac. After one request, the proof came back looking exactly like I wanted.
  2. Fast. Turnaround time was quick. After requesting edits, the proof came back shortly thereafter. After placing my order, it was shipped two days later.
  3. Mailed without ever going to the post office (for free + cost of stamp). You can enter all your addresses and Paper Culture ships your cards for you. No buying stamps, licking envelopes or waiting in line at the post office.
  4. Individual Personal Messages (for free). I entered one general message to print on the back of all my invites. But in addition to that, I easily personalized each and every message that got mailed out.
  5. Repeatedly surprising me. I received a $15 credit for filling out a quick survey. Then out of nowhere, my shipping was upgraded for free and would arrive a few days sooner. Then after I received my pretty little box of cards, there was a 20% off coupon for a future purchase. It was like bringing a sale item up to the register to find out it was discounted even more – pleasant surprise and score!
  6. Heavy cardstock. Don’t you just love the feel of solid quality paper? Haha ok probably not everyone notices these things. But I sure do! And rounded corners add a nice touch too! Here’s how they compare themselves to typical competitors like Tiny Prints and Shutterfly.
  7. Ecofriendly. They plant a tree with every order!
I definitely appreciate good customer service and attention to detail which sometimes is hard to come by these days. As you can see, I had a very positive experience with Paper Culture for Mia’s Winter One-derland birthday party last year. And even better when I won their contest for free passes to BlogHer J They did not compensate me for this post. They did not provide me with any free products. They are not my sponsor (I don’t have any). I loved them before the free conference passes.

Have I sold you on it yet? I hope so, because they have a $50 gift voucher for one of you! Here’s how you can enter to win: {If your account isn't linked to your email, make sure you leave it in a comment!}

Required: Stop by Paper Culture and comment on this post with what you’d use your voucher for.

Optional extra entries, one for each: {leave a separate comment here for each that you did}. 
Like Paper Culture on FB.
Subscribe to a {day} with lil mama stuart via email – if you already do, just let me know!
Follow me via Google Friend Connect - no blog/blogger account needed! If you already do, just let me know!
Tweet this giveaway.
Post this giveaway on your blog.
Post this giveaway on your FB page.

That’s a total of seven possible entries per person! Giveaway ends Sunday, October 2, 2011 at 11:59 CST. Winner will be chosen at random and announced on Monday.

Wednesday, September 28, 2011

**CLOSED** Giveaway #3 – Baby Byrds

Mmmk day three of four. Did you catch the first and second giveaways? Hop on over, you can still enter those too!

Next up is etsy shop Baby Byrds. Not long ago, I gave you a peek at Mia’s room and the personalized print I have to decorate it. Not to mention the nine other prints I’ve ordered for all my nieces and nephews! So you know that I highly recommend Christen’s work! With all ten prints, she was so patient with the customization of colors, patterns and images. Now one of you lucky ducks can have your very own 8x10 personalized print too! Don't have a child? That's ok! I'm sure you have a niece, nephew or a friend with a kid, right? *Note, these pictured below are 11x14 in frames purchased from Michael's.  

Contrary to what most people think, you don’t need to have a blog, tweet or FB account to enter giveaways! Here’s how you can enter to win an 8x10 personalized print from etsy shop Baby Byrds:

**If your account isn't linked to your email, don't forget to leave it in each comment**
Required: Visit Baby Byrd’s shop and comment on this post with the name of your favorite print.

Optional extra entries, one for each: {leave a separate comment here for each that you did.}
Like Baby Byrds on FB.
Subscribe to a {day} with lil mama stuart via email - Already do? Just let me know!
Follow me via Google Friend Connect (no blog/blogger account needed! ) - Already do? Just let me know!
Tweet this giveaway.
Post this giveaway on your blog.
Post this giveaway on your FB page.

That’s a total of seven possible entries per person! Giveaway ends Thursday, September 29, 2011 at 11:59 CST. Winner will be chosen at random and announced on Friday.

I have one last giveaway tomorrow, $50 value, don't miss it!

Tuesday, September 27, 2011

**CLOSED** Giveaway #2 - Ruffled Begonia

Alrighty, we’re on to day two of my blogiversary giveaway week. Did you check out yesterday’s prize from Little Penelope Lane? Go on, you can still enter!

Remember how I told you about Linda’s hilarious “You know you’re a craftaholic when…” post?  Well today, Linda from Craftaholics Anonymous graciously offered to giveaway a pretty ruffled apron pattern! The winner will receive a PDF pattern with 18 pages full of color photos, illustrations and step by step instructions to make this pretty little thing. Now, I may not rock an apron in the kitchen (and choose to wipe my dirty hands on my t-shirt and sweat pants while I cook), but I know I could use this tutorial and apply it to make a bed skirt, valence, skirt/smock for Mia, decorate the fronts of sweets tables, the cabinets in Mia’s not-yet-existent kitchen set, and so much more!

Contrary to what most people think, you don’t need to have a blog, tweet or FB account to enter giveaways! Here’s how you can enter to win Ruffled Begonia’s pretty ruffled apron pattern with pockets:

**If your account isn't linked to your email, don't forget to leave it in each comment!**
Required: Visit Craftaholics Anonymous and comment on this post with the name of your favorite tutorial.

Optional extra entries, one for each: {leave a separate comment here for each that you did.}
Follow the Craftaholics Anonymous blog.
Follow Craftaholics Anonymous on twitter
Like Craftaholics Anonymous on FB
Subscribe to a {day} with lil mama stuart via email (on the right) - If you already did, just let me know!
Follow me via Google Friend Connect - no blog/blogger account needed! If you already did, just let me know!
Tweet this giveaway.
Post this giveaway on your blog.
Post this giveaway on your FB page.

That’s a total of nine possible entries per person! Giveaway ends Thursday, September 29, 2011 at 11:59 CST. Winner will be chosen at random and announced on Friday.

You still with me? I have two more giveaways this week, check back in tomorrow!

Monday, September 26, 2011

**CLOSED** Giveaway #1 – Little Penelope Lane

Hi there! Were you able to dodge the on and off rain this weekend? Luckily I did when photographing Noah and Erin! It’s so fun seeing how these two have changed since March. And so much more fun shooting outside!

Can you believe it’s the last week of September already!? Crazy how quickly time flies! And can you believe after 210 posts, 42,000 page views, 112 followers and 400 comments, Friday marks my one year blogiversary?! Hoooray! To celebrate, I’ll have a week of giveaways for you! Come back every day to see what you can win!

Remember how I adored the Little Penelope Lane booth at the Queen Bee Market? To kick of my first blogiversary, Sarah has been so kind to give away this “Fall in Love” hair wrap to one of you! It is one size fits all  (simply tie the ends together) so it can be for you, or your little one! Mia likes to make me wear her hair accessories or she likes to wear mine, so this would be perfect for us! You should also read about how Little Penelope Lane began here. I admire people who make the most of what they've been dealt.

Contrary to what most people think, you don’t need to have a blog, tweet or FB account to enter giveaways! Here’s how you can enter to win Little Penelope Lane’s “Fall in Love” hair wrap:

**If your account isn't linked to your email, don't forget to leave it in each comment!**
Required: Visit Little Penelope Lane’s Store and leave a comment on this post with the name of your favorite hair accessory.

Optional extra entries, one for each: {Leave a separate comment here letting me know which you did.}
Follow Little Penelope Lane’s blog.
Follow Little Penelope Lane on twitter.
Like Little Penelope Lane on FB.
Subscribe to a {day} with lil mama stuart via email (on the right)
Follow me via Google Friend Connect (use the “Join this site” button on the right) - no blog/blogger account needed!
Tweet this giveaway.
Post this giveaway on your blog.
Post this giveaway on your FB page.

That’s a total of nine possible entries per person! Giveaway ends Thursday, September 29, 2011 at 11:59pm CST. Winner will be chosen at random and announced on Friday.

Thanks for reading! Having an audience makes blogging all the more worthwhile!

Friday, September 23, 2011

Downtown Chicago Magnificent Mile Wedding

Last weekend, Doug stood up in our friends’ wedding. Judging from my bouquet toss two years ago, (and the lack of participation from a majority of my friends) it was pretty clear who was getting married next.

Girl’s got hops, fought for that bouquet, and tore it up!
photo via MishaMedia
Mia did well in church. But man, does she talk a lot! “Read. Read. Book. Mom read book. Goldfish. Open. Mommy Open. Please. Mommy hold. Singing. Pretty singing. Kid. Kid. Kid standing. Mia standing. Mommy walk. Picture. Take picture. Church. Take picture church. Take picture Mia. Camera. Daddy. Daddy walk. yaddayaddayaddayadda…” I think we kept Auntie Shannon thoroughly entertained. I still managed to get a few shots in with a talkative toddler by my side.

The new Mr & Mrs!

Mia stayed home after church and I snooped around the reception to check out all the details. Brides and grooms put so much thought, time and effort into the little things, the least we can do is appreciate them!

The wedding was captured by the one and only MishaMedia, but I can’t pass up an opportunity to practice. My friend even said at dinner, “You can’t stop envisioning your pictures, huh?” I enthusiastically replied, “No I can’t! Can you tell? Doug even asks me what I’m thinking about when I get a blank stare when we’re out and about. And I tell him ‘I’m picturing my shots!’ Even if I don’t have my camera with me.” She said it was written all over my face as I’d constantly scan the room and then whip out my camera. What can I say? Creative minds just don’t have an off switch!

Ok back to the details…El map place cards. And oh so Chicago Garret’s popcorn for favors, yum! To add a personal touch, they lined the guest book table with their collective race medals. These two are quite the athletes!

The giant backdrop and purple lighting at the Chicago Marriott Downtown Magnificent Mile definitely set the mood. Chicago landmarks for (DIY) table numbers, flowers by Palomino Floral Designs

The couple obviously went with a Chicago themed wedding, starting with the skyline silhouette on their invite (seen in the background here). And how unique is their cake?! Loved it! When you look closer, it’s a simple three tiered square cake embellished with our city’s iconic skyscrapers. Not to mention, it was delicious!
cake by the Chicago Downtown Marriott
The beautiful bride rockin’ her Winnie Couture dress…

The couple had an enormous entourage, including these adorable little ladies in their lovely flowy dresses.

For awhile now, the bride and groom have been taking dance lessons at Ballroom Dance Chicago. And boy did it pay off! The crowd loved their fancy moves! Doug and I sure weren't that graceful.


And here is a classic big ol’ smile from the groom. The bride had no idea what he was pulling out from under there!

And after that, I drank, talked and danced the night away. I noticed that I take more pictures of details than I do of people. I need to work on photographing people! Sometimes I wish I had my point and shoot to pull out for the fun drunken friends’ moments. It's hard to find the right balance of actually being in the moment to enjoy it versus capturing them. Anywhoos, I topped the night off with a White Castle slider at the bride and groom’s after-party in the Presidential Suite J It was a beautiful day, I hope you two enjoyed it!

Tune in next week for my one year blogiversary and lots of giveaways!
Have a great weekend! I'll be busy shooting photographing three babies!

linked up here:
Sweet Shot Day

Wednesday, September 21, 2011

Family Vacation to Wisconsin Dells

Remember how Doug and I went to Mexico and felt bad for having fun in the sun without our baby? We decided to make it up to her with a classic Midwest vacation to Wisconsin Dells. We left at 5am so Mia could sleep most of the way. Phew! My plan worked and she slept for two of the three hours. {Travel Tip #1 - Time your travel time with your kid's sleep schedule. Less time awake = less time to entertain = less opportunity for meltdowns = happier parents. }

After my babies enjoyed their breakfast at Mr. Pancake, we were off to do the hour long Original Duck Tour. Honestly, this entire trip is exactly what I did with my nephew four years ago. Minus Storybook Gardens and a carnival type area because they both closed L
Ryu @ 2.5 years old
Mia @ 1.5 years old
We got suckered into this $20 picture package because I knew that it’d be the ONLY picture with the three of us ever the entire weekend.

Mia loves playing in the water, so at 11am we pre-registered and spent two days at the Wilderness Resort. They have three outdoor pools and three indoor pools, but we had warm in the sun/cool in the shade weather which was perfect.  {Travel Tip #2 - Bring your own towels. The hotels "pool" towels were tiny like the ones at the gym!} Mia happily bobbed in these swings for 15 minutes at a time. Which is a pretty long attention span for a toddler if you ask me!

On day two, after the hotel’s breakfast buffet (meh), we had lots of fun crawling through the hotel's climbing/jungle gym type area.  After breaking a sweat, it was naptime, then back to the pool.

For dinners, Mia enjoyed the hibachi at Ginza of Tokyo, but was in meltdown mode the second night at Famous Dave’s in downtown. {Travel Tip #3 - Pack lots of snacks. The gladware snack cups are the perfect size.} Downtown was kind of depressing. Other than the Duck Tour and hotel pools, I felt like there wasn’t much else for my 18 month old baby to do. The Dells just isn’t how I remembered L I loved our yearly motorhome camping trips out there as a kid. And Mia loves maps just like mommy and daddy hehe. {Travel Tip #4 - Pack a small bag full of various activities.}
On our way home we hit up the outlet mall and endured another meltdown. Luckily after that, she passed out in the car for awhile. Overall, to my delight, Mia pooped at the right times (phew!), slept most of the time in the car, wasn’t too terrible at meals, and enjoyed her time in the pool. Looks like my babies had a fun first family vacation, no?

Tuesday, September 20, 2011

Party Ideas: Star Wars Birthday

Danielle from All Things Creative has two boys and now a little baby girl! She truly is a wonder mom who does it all from designing invitations, making numbered t-shirts, cranking out batch after batch of cake pops and if there were more time in a day, she’d be a photographer too!

Not only can Dani take on all these creative endeavors while at home with two boys, but she was also dealt a wild card in 2010 that changed her family’s life. Anyone with a child or who knows someone with a child MUST READ about Retinoblastoma, a life threatening cancer within the eye usually discovered in babies between the ages of 6 and 24 months. It touches my heart every time I read about B’s fight with cancer and the amazing strength that Dani and her family have to B strong. Go on - read about it now. I’ll wait.

Mmmmk now that you know about little B, I want to share his big brother's Star Wars 4th Birthday Party with you. Knowing how I also love all things creative, Dani asked me for some Star Wars party ideas and this is the pinterest board I threw together for her.

Despite being very pregnant and emotionally spent, Dani whipped up plenty of creative details in just a few days to make the party special for her little man. {light sabers from pool noodles, napkins and chocolate covered pretzels}

Parties don’t always have to be a big expensive ordeal. It’s the thoughtful little elements that make a big impact. And the little details make the littlest ones happy, which is all that matters, right? J

Monday, September 19, 2011

DIY Business Card Holder - Duct Tape Project!

As if cutting 200 business cards and packing for my last minute trip weren’t enough to do at midnight, I felt the need to make a business card holder. My crazy scatterbrain was running around with how to make one out of fabric. But that required busting out my sewing machine at 1am for a project that I didn’t know how I was going to execute. Instead, I turned to a random Joann’s purchase that I had no intended use for – pretty duct tape! Here’s my DIY business card holder tutorial using card stock, duct tape, fabric glue, staples and bias tape (I didn’t have yellow ribbon).

1. Cut a piece of cardstock to 7in x 4in.
2. Take a 7 in long piece of pretty duct tape and cover ½ of the cardstock. Repeat on the other half.
3. Glue a 7 in long piece of ribbon along the middle to hide the seam where the two pieces of duct tape meet.
4. Fold the cardstock in half to make a crease.
5. An inch from one end, fold towards middle. Repeat with other end
6. Make sure your business cards fit into the pockets. Staple in the 4 corners and there you have it!

linked up here, here, and:
The Stuff of Success

As seen here:
homemade crafts

Wednesday, September 14, 2011

DIY Business Cards Tutorial

Since I got ready for BlogHer in a few days notice, I had to whip up some business cards in no time! Here’s my no design background whatsoever way of designing your own business cards using picnik.com (a free photo editing website).

1.  Upload a background. Sprik Space has an amazing series of free patterns, in 20 colors! The project possibilities with these are endless!

2. Roughly crop your photo to a rectangle shape. Then resize it to 1050x600 (unclick the "keep proportions" box) for a 3.5x2 business card. The proportions of the pattern might get skewed, so keep undoing and play around with the cropping and resizing until your pattern looks right. 

3.  Add text boxes with your pertinent information (name, email, website, twitter handle, Facebook page, phone number and address if you aren’t creeped out by that, etc). Change the colors and sizes and rearrange to your liking. TIP: Always note the numbers of your colors. It's easy to match later on if you mess up or recreate your file.

4. I added clip art from their selection of stickers (I do not have a premium account). Right click to rotate, flip, resize and reposition as you please. Adjust colors and sizes. TIP: Don’t make a border around your card. The cutting process is not precise, so it’s easier to just not have one.

5. Save your file. 

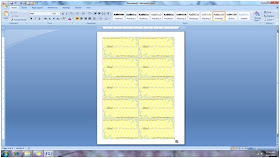
6. Open a word doc. Insert your business card file. Double click or right click to resize to 3.5x2 (uncheck "lock aspect ratio" box). Adjust your page margins to be .5 all around. Copy and paste 9 more, so you have 10 on a page.

If you want a double sided business card, repeat all steps.

After doing a few test prints, I brought a jump drive with the two files (one for front and one for back) to Office Depot for printing (I’d do the cutting myself). It cost me $25 to print 200 business cards (20 sheets) double sided on glossy paper.  Then it was just me, 20 sheets, and my paper cutter in my closet floor for two late nights. Turns out I only dished out 60 cards in my 2.5 days at BlogHer’11. Should I hand the other 100+ out to every parent I see at the park??
What do you think of this tutorial? Will you try making your own business cards? Check back tomorrow to see the business card holder I made for these pretties. Are you glad we're back to some DIY'ing around here?

linked up here, here, and:


Thanks for the feature Jen and Nikki!