After Little Beans Café, all three of us went to Joann so I can gather enough goodies to cross some art projects off my list. It was so cute to see Mia scoping out the scene from the top of the cutting table and to slowly wander the aisles - that’s mah girl! J This project however didn’t even involve anything I bought. It actually wasn’t even on my list of near future to-do’s haha. I get sidetracked very easily…
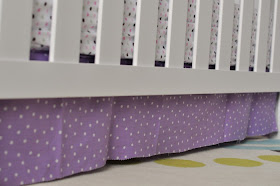
My SIL has graciously given us a ton of hand me downs from Ryu and Kira, but the crib skirt was bugging me. It didn’t match the rest of the room and I can’t help being a matchy matchy person! As I was working on a tutu for the newest baby girl, expected any day now, my crafty scatterbrain walked into Mia’s room for some reason, then my fabric stash for some reason and all of a sudden I was working on a new crib skirt! I told you I get sidetracked very easily. I didn't even finish the tutu that day! But I did make a crib skirt, which isn't easy to find without buying a complete bedding set.
Here's my 3 materials, 5 step, 30 minute, no sew tutorial for a crib skirt. If you can cut a straight line and tie a bow, which I believe you had to master in kindergarten, you can do this...
Here's my 3 materials, 5 step, 30 minute, no sew tutorial for a crib skirt. If you can cut a straight line and tie a bow, which I believe you had to master in kindergarten, you can do this...
Materials/Cost
Fabric - I’m guessing a yard would do? I used leftover fabric from the Winter One-derland. $0!
String/Ribbon - I used scraps of whatever I had on hand from the edible pacifiers. $0!
Pinking Shears – Thanks Santa J $0!
Time: 30 minutes
Instructions:
- Measure the length of your crib. Measure the height (to the springs) of the crib. Add an inch to the height and cut one piece using pinking shears.
- Measure the side of your crib. Use the same height + an inch as in step 1. Using pinking shears, cut two pieces. Now you have three pieces, one for each side. My crib is against the wall so I didn’t need a fourth.
- For each piece: fold your fabric over that extra inch. Snip a slit about an inch from the inside of each end. I also made a slit in the middle of the long piece.
- Place your string/ribbon in each slit.
- Tie to the corners of the springs of the crib! This is what took the longest. It’s not easy to tie a bow when you have to squeeze your hands through those bars.
Easy right?! I suppose if you wanted to do it right (and use a sewing machine) you could (iron your fabric, whoops) hem each piece. You could even get fancy and gather it for a ruffle effect or add trim yadda yadda. But this was just a quick fix to ease my "that thing doesn't match all the other stuff and everything needs to be perfect" issues. Pictures of the whole room eventually, I swear!


What a great idea! Isn't it fun when you can whip something together and have everything on hand? :) Looks cute!
ReplyDeleteI just found your blog and am your newest follower. You had me at "no sew"! This is fabulous and something I could actually make. Thanks for the great tips and blog!!
ReplyDeleteI just chanced upon your blog and came across this tutorial. OMG...I'm one "I can't sew for nuts" Mom and I have always wanted to get a pretty skirting for my baby's cot. This is a definitely a easy tutorial to follow and who knows it can be made so easy. Love it and thanks for sharing this awesome time saving idea!
ReplyDelete