Wednesday, February 29, 2012

DIY Fireman Birthday Party Ideas

Brendan’s birthday was last Friday and his mom, Danielle, thought they were set on a superhero/Batman party. Just 12 days prior to little man’s birthday, I got an email from Danielle titled “Help!!!” Turns out the soon to be 3 year old flipped the switch and wanted nothing other than a fireman party! In two weeks! When I got the email, Doug saw me smiling at the computer wondering, “What the heck is she so happy about!?” As usual, I was giddy with excitement to gather party ideas!  Check out my fireman party pinterest board here.

The night before the party, I got another email from Danielle. This time saying that she feels like she has NOTHING for the party. Given how Danielle has successfully decorated parties at the last minute, I had no doubt that she could pull this off in less than two weeks. And she sure did!

How fricken’ cute is that cake!? Recipe/idea from BettyCrocker. See those flames on the counter!? So simple, easy and big impact!

Looks like some building fires need to be put out with some water droplets!

And how cute, yet boyish is the invite!? The graphic designer that she is, Danielle just whipped this baby up! Check out Danielle’s facebook page for more of her designs, edibles and plenty of other creative projects.

We totally wish we were neighbors to DIY our crafty hearts out.

Friday, February 24, 2012

DIY Popcorn Cones Tutorial

Garrett's popcorn is always a crowd favorite and I included it amongst the other finger foods at Mia's birthday party. Want to know how to make your own popcorn cones and display? It's free, easy and is a different way to serve a typical party food.
Time: Hard to say. I made the cones over various nights while watching DVR'ed shows.
Cost: Free! because I had all supplies on hand. Gotta love DIY!
Supplies:
Paper - 7x11 for each cone (cut a bit off a normal sized piece of paper) My patterns are from SprikSpace.
Wax or Parchment Paper - a little bit smaller than the paper above
Boxes
Wrapping Paper
Tape

Instructions - Popcorn Cones
1. Hold bottom left corner (B) in your left hand. Take top right corner (A) with your right hand and roll it down and around/behind (B).
Note: Unlike the picture below, your pattern should be on the outside.

2. Roll (A) all around to the back and readjust until you get a cone shape. The tip of your cone can have a whole/opening in it at the bottom, as long as it's smaller than a popcorn kernel. (D) should end up being the top/opening of your cone and (C) should be the bottom.
3. With one piece of tape, seal the seam on the inside. With another piece of tape, seal the outside seam. The outside seam should end up on the backside of the cone. See how there's no seams from the front?

4. Repeat with remaining cones.

5. Because no one wants to see how greasy their snacks are, line the cones with wax or parchment paper. Similar to steps 1-2, make a cone shape with the wax paper and insert into paper cones. Tape in place if you need to, but it's probably not necessary, especially after you fill them. See how the wax paper isn't taped in?  

Instructions - Popcorn Cone Display
1. Find a box in a size you like.
I happened to have two Janie and Jack boxes in similar shapes but different sizes. Perfect to add height to my table. Am I the only one that gets excited by boxes that nest nicely?

2. Estimate how many cones you can fit along each box. Mark spacing with a pencil
Note: The tops are wider than the base, so leave enough space between each. I held up a cone or two and eyeballed it. 

3. Make Xes with an exacto knife where the cones will be inserted. Stick your finger in the Xes to open them up a little.
Note: Don't make the Xes too big! Just big enough for the tip of the cone to be inserted and stand steadily on it's own.

4. Repeat with remaining Xes. Put all your cones in and see how they stand/look.

5. Wrap boxes. Feel where the Xes are and poke inwards through the wrapping paper. Embellish boxes with ribbon, etc. Put loops of tape on the big box to affix the small box to it. Put all your cones in and see your finished product!


linked up here:
Home Stories A2Z

Thursday, February 23, 2012

Easy Chocolate Chip Cookie Recipe

For Mia's party, I made M&M cookies. This chocolate chip cookie recipe is my go-to cookie recipe. Simple, easy and delicious. 

I don't like re-posting other people's content, but I can't remember where I got the recipe from, more than 2 years ago now. An email from the Tribune maybe?

For the party, I just swapped out chocolate chips and replaced it with pink and white M&Ms. I usually also halve the recipe.

After-school Chip Cookies
Prep: 15 minutes
Cook: 8 minutes per batch
Makes 4 dozen

Ingredients
2 cups flour
1 tsp salt
3/4 teaspoon baking soda
2 sticks (1 cup) unsalted butter, softened
1 cup sugar
2/3 cup light brown sugar
2 teaspoons vanilla extract
2 eggs
1 bag (12 oz) chocolate chips

Mix: Whisk together flour, salt and soda in a medium bowl.
Cream: Beat butter soft with an electric mixer on medium, 1 minute. Add sugars and vanilla; beat fluffy, 1 minute. Add eggs, beating 1 minute after each. Switch to low speed; briefly mix in dry ingredients. Stir in chocolate chips with a spoon.
Bake: Heap 1 tablespoon mounds of dough onto a parchment lined baking sheet. Slide into the center of a 350 degree oven; bake until cookies turn golden at edges and soft in the center, 8-10 minutes. Cool on a rack. Repeat with remaining dough.

Sometimes less is more!


linked up here:

Wednesday, February 22, 2012

Chicago Restaurant Week - Michael Jordan's Steakhouse

Chicago’s 5th Annual Restaurant Week started last Friday and ends next Sunday February 26th. You get a three course prix fixe dinner for $33 (or $44) and lunch for $22. Last year I went to Zapatista, Terzo Piano and Perennial. This year, I only went to one – Michael Jordan’s Steakhouse in the InterContinental Hotel on Michigan Avenue.

A few months ago, I’d been to MJ’s for lunch, and wasn’t impressed. Lobster roll with a sherry aioli, tarragon and parmesan crisp? Bleh! Yes yes, I shouldn’t get a lobster roll from a steak house. Despite my impression that MJ’s is a typical mediocre lunch spot that probably won’t last, I went again. Only because Doug idolizes the "Greatest of All Time." And I'm a good wife. Even though I didn't pay. J

We started our four course meal with garlic bread bathed in a buttermilk blue cheese fondue. It tastes just like it sounds. And it. is. good. Crispy and cheesy yum!

For the second course, Doug had the lobster chowder, and I had the arugula and shaved fennel salad  (with toasted pine nuts, shaved cheese and blood orange vinaigrette). Doug said the chowder was the worst he’s ever had!! I've never had lobster chowder, so I’m not sure what it should taste like. But even so, I didn’t think it was very pleasing to the palette. I did like my light and refreshing salad though.

For entrees, Doug had the Natural Angus Hanger Steak with black garlic bordelaise while I had twin petite filets with caramelized onions and gruyere. Doug thought his was fine. I liked the onions and little bit of cheese with my filets, although one seemed to be cooked more than the other. The ladies next to us sent their filets back to the kitchen since the steaks weren't cooked to their liking. Yikes! We also ordered a side of the mashed potatoe trio. My favorite was the horse radish cheddar. Doug's favorite was the lobster chive. And neither of us liked the sweet potato marshmallow - definitely too marshmallowy. We probably could've done without the sides.

In addition to our meal, Doug got the beer pairing (four 5 oz beers for $14) and I had the wine pairing (four half glasses for $25). We both enjoyed our first three drinks. I couldn’t even drink the dessert wine, it was too sweet and rubbing alcohol tasting. Maybe I don’t have a sophisticated enough palette to enjoy a dessert wine (other than Moscato), but still, it was undrinkable. Doug's last drink was a 9.8% stout, so he was happily buzzed to say the least.

To top off our already stuffed bellies, we had the Chocolate Tart with Black Dog malted vanilla gelato and Butterscotch Panna Cotta with Garrett’s Chicago mix popcorn and smoked sea salt. The chocolate tart was perfectly rich and creamy with a nice crumbly yet firm crust. The panna cotta with popcorn was different. We didn't care for it too much and didn't even finish it.

All in all, we won’t be going back. Apparently other people must feel the same considering the restaurant was not even close to being filled on a Monday night at 7pm. Doug was hoping to see memorabilia (like Ditka’s) and the meal was good, but not outstanding (and they charged the higher price of $44 vs $33). Despite our mediocre restaurant week experience, I do recommend you make your Restaurant Week reservation, there's a few more days! You're bound to find something among the 200 restaurants to choose from. I had my eye on Union Sushi (new to try), Joe's Stone Crab (solid menu for the price!), Perennial (our favorite by far), and Table Fifty-Two (who doesn't want to try this?).

I'd love to hear what you ate!

Tuesday, February 21, 2012

Pink & Grey Striped Birthday Party: Decorations

**Update** If you're stopping by from Linda's washi tape party, or live.laugh.rowe's washi tape party, I used washi tape to decorate a picture frame, make sandwich flags, tape appetizer forks to cups, seal treat bags, label centerpieces and to make buntings!

Now that I’ve strung you along with two sneak peeks and my inspiration for Mia’s second birthday party, are you ready for the full reveal?!? This little two year old sure was ready for her party, matching outfit and all! And the outfit was totally not planned! It happened to be a Christmas present - thanks Auntie Judy, it was perfect! 

Main Party Supplies/Décor Elements
I kept the food and decor simple since the play café had a lot going on already. My theme was clearly pink and grey stripes, balloons and Mia’s stuffed animals. From my pinterest board, you probably have no idea what direction I was going! 
I wrapped phone books and empty boxes to add height to the table.

It only takes a few design elements to pull an event together. Seriously, the party was decorated for $60! These were the basic supplies for Mia’s party, which could be slightly altered to create a Sweet Shoppe, Vintage, Spa or even Circus party.

Striped Paper & Large Scallop Punch - The striped paper you see throughout is a FREE pattern from Sprik Space that I printed or used in picnik.com to design coordinating thank you tags, food and drink labels and a banner.

Mia’s Stuffed Animals – Marissa did an amazing job customizing the invite as did Kat on the cake!

Striped Washi Tape and Baker’s Twine – simple way to add color and continue the striped theme. My washi tape was from Sweet Shop Lulu, but you can find lots on etsy too.
Custom name print from etsy shop Baby Byrds.

Balloons – Seen on the invite and used at the food, gift and favor tables.

Food Table
Just like my décor, I kept the food simple. All the food (I made most of it - the day before) and drink to feed 45 people cost ~ $100 (not including the cake). Parties don’t have to be big and extravagant people! It’s the little touches that bring it together and make it special.
Ham and Cheese Sandwiches - To make DIY flags: add washi tape to toothpicks. Cut triangle from end to make a flag.
Pasta Salad - Not pictured, but recipe here.
Fresh Fruit Cups - Tape appetizer forks (from Party City) to cups with washi tape.
Garrett's Popcorn - Tutorial for the DIY popcorn cones and display can be found here.


M&M Cookies - Here's the recipe. It’s my go-to cookie.
Home Made Thin Mints - You MUST make these. It’s my new go-to cookie recipe. Seriously, you’ll never want a Girl Scout cookie again. Note: I used andes chocolates because I can't find the baking chips.

Drink Station
Pop and Water Bottles – wrapped in DIY labels (FREE)
Juice Boxes – wrapped in patterned paper (FREE) and ribbon

Pink Lemonade – pink and grey striped straws from Shop Sweet Lulu 

Other Décor
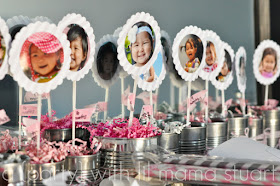
DIY Centerpieces - To top the café tables, I made picture displays from a soup can, bakers twine, newspaper (to stuff the inside), a skewer (that my mom saved from an edible arrangement), paper shreds (that came from my Shop Sweet Lulu packaging), patterned paper and a scallop punch. What I’m saying is that it was FREE, other than the cost of pictures, and $9 for 180 yards of baker’s twine from Pick Your Plum that I used throughout the entire party with a LOT of leftovers.

DIY Happy Birthday Banner = Patterned paper with letters in picnik + scallop punch + wrapping paper + glue stick

DIY Party favors - I filled treat bags from Pick Your Plum with pink and white frosted animal cookies (from Jewel). I loved those cookies as a kid! I designed a thank you tag in Picnik using a background from Sprik Space then cut with a scallop punch. I sealed the bag with washi tape and attached the tag with baker’s twine.

DIY Coloring sheet – I took a picture of Mia’s animal friends and used this tutorial from Centsational Girl to make a customized coloring sheet. Cool, huh!?

Surprisingly, this party came together easily and nearly stress free. The staff at Family Grounds Café were super helpful with the quick (less than an hour) setup.

Auntie Agatha was super helpful too, who I almost brought to tears when I surprised her with a personal mini birthday cake. 

Mia had fun and enjoyed helping me with the decorations.
She's still talking about her birthday, which makes it all worth while!


Linked up here:
Sweet Shot DayCraftaholics.net

As seen on:

Monday, February 20, 2012

P52 {7} - True Love

Honestly, I wasn't feeling very inspired by the "True Love" prompts this week/month. Everything seemed so cliche, but I made it work.

True love, my little family of three...as interpreted by artist Auntie Agatha.

Sometimes I wish I had a macro lens. But I have other gear lined up first! Anyway, as CPAs, Doug and I © numbers. *snort* Even though he called me a nerd for taking this picture. And then didn't even notice 5.31 is our anniversary. Jerk!


linked up here:
project 52 p52 weekly photo challenge my3boybarians.comLive, Love, Travel